In this tutorial, I will teach you how to secure a minimal API built with .NET 6 using JSON Web Tokens (JWT) for authentication and authorization. We will cover the basics of JWT, including how to create and validate tokens, as well as how to secure our API endpoints using built-in .NET 6 features. By the end of this tutorial, you will have a solid understanding of how to secure your own APIs using JWT and .NET 6, and you will be able to implement similar security measures in your own projects.
Things you should know
For this tutorial you need to know or have the following terms/techniques:
- General C# and .NET knowledge
I am using .NET 6 for this tutorial. - Visual Studio 2022 or higher
- A minimal API with .NET 6 or 7.
Table Of Contents
Before we set off
For this tutorial, you need a minimal API with .NET 6 or 7. If you are unfamiliar with this, I highly recommend reading the tutorial about the minimal API with .NET 6. You can find the tutorial here.
I will continue with the end product of the tutorial. If you want to download the project, check out the project on GitHub.
If you just don’t want to read the whole tutorial, while I added a lot of love and time into it, you can find the end product of this tutorial on GitHub as well:
https://github.com/KensLearningCurve/SecureMinimalApiDotnet6
What do we want to secure?
Security is one of the most important parts when developing software. Especially when there are a lot of people trying to get their hands on data they aren’t supposed to see. It’s part of our job to make their activities as impossible as possible. Of course, hosting, client computers, and more are important parts of security too. And we, developers, don’t have any knowledge about those parts.
APIs are online all the time and usually pass on a lot of data. It’s important to secure APIs (and any other web application). A good practice is to let a user log in, send a token to the user, and let the user use that token for other requests. This way the API knows who’s knocking on the door. Requests without a token are denied access.
JWT
This token is in most cases a JWT, which stands for JSON Web Token. So, don’t call it a JWT token, because then you have a JSON Web Token token. A JWT can be described as the key to unlocking the door to the API or any other application. The token is an encrypted string that contains basic information.
Never put personal information in the token. Yes, it is encrypted, but it’s easy to decrypt. So, never put names, addresses, credit card information, or whatever can be linked to a real person in a JWT.
I will be using the JWT for this tutorial.
Setting up the API
Let’s move to the API. There are a few things we need to do:
- Set up the API so we can use authentication and authorization.
- Create a mapping that logs in a user and returns a valid JWT.
- Make the other mappers require authorization.
Let’s start with setting it up.
Add authentication
First, we need to register authentication services required by authentication services with the AddAuthentication method. We add this to the builder.Services. It looks like this:
But this is not enough. There are several ways to handle the authentication and we need to tell our API which one to use. In this case, I want to use the JWT. Actually, I want to use the JWT bearer, which means the JWT should be placed in the Authorization header of the request. This way the API knows where to look for the JWT.
To add the JWT bearer we need to install the package Microsoft.AspNetCore.Authentication.JwtBearer. After that, you can add it to the authentication:
We need to tell the API what needs to be checked in the JWT before we grand access to our data. Let’s add them:
The ValidIssuer contains a string that represents the entity that has issued the token. Usually, it’s the URL, but it can also be a random string.
The ValidAudience represents the audience which this token is intended for. This can be a URL, a random string, or an array.
Then we have the IssuerSigningKey, which is an encrypted key that is also in the JWT. The key here and in the JWT should be the same.
The next 4 options are booleans and with these, you can control what the API should check. In this case, it should validate the issuer (ValidIssuer), the audience (ValidAudience), and the issuer signing key. The lifetime, the expiration of the JWT, should not be validated.
The items to validate should be a one-to-one match between the settings here and the values in the JWT. All these items are for authentication, thus when someone needs to prove he/she has really access to the data.
Add authorization
Authorization is telling the system who you are and the system provides you the key if it knows you. We need to tell the API that we want to use this service. So… Let’s add it:
I added this line below the AddAuthentication.
Done! No, really. It’s that easy.
Use the services
We have added the services to the builder, but we didn’t tell the application to use them. Therefore we need to tell it to the application explicitly.
Somewhere in the Program.cs you’ll see app.UseHttpsRedirection(). Add the following lines just under it:
Now the API is ready for some authentication and authorization!
Mapping for token
Before a user can do anything he/she needs a token. To get that token we need a login mapping. This will be a POST mapping and it will receive data that can be mapped to the model User. This is my User model:
A simple username and password. This is what the user enters and sends to the API.
The mapping
The mapping will look like this:
I have set the endpoint and added the model User to the parameter list. I also added [AllowAnonymous] so the API knows you can call this endpoint without being logged in because you don’t send a token with the request.
Next up is the token generation.
Token generation
To generate the JWT we need the SecurityTokenDescriptor. This class has all kinds of methods and properties to spit out a JWT, which will be an encrypted string.
First, let’s implement what should happen if the username and/or password is incorrect. Usually, you should store users in a secure database, but let’s keep it simple for now:
If I would enter a username like “john” and a password as “wick” I should get a 401 code in my response:

That works. Now let’s generate a token when the credentials are correct.
Let me walk you through it:
On line 6 I initialize the SecurityTokenDescriptor. This has a few properties I need to set. It starts with the Subject on line 8. Here you can add anything you want. You can add information that the client can read because this part is not highly encrypted. Don’t add sensitive information to the subject!
The Expires sets the expiration date and time of the token. If the API checks for this, which is set off in our API (ValidateLifetime = false), it will give a 401 when the token has expired. I set the expiration on the date and time of now plus 5 minutes on line 12.
The issuer and audience are familiar to us and need to be the exact data we used in the TokenValidationParameters of the AddJwtBearer. That is why I set the issuer to “http://localhost” and the audience to “http://localhost/audience” on lines 12 and 13.
And last but not least we need to set the SingingCredentials on line 15. This needs to have the exact same key as we used before.
After setting up the descriptor we need to create the token with a JWTSecurityTokenHandler. This will translate all the information given above into a string. On line 19 I initialize the JWTSecurityTokenHandler. The next line, line 20, creates the token with the information in the tokenDescriptor. And on line 22 I use the WriteToken to make the string token. This string token will be sent back as a response to the client on line 24.
The theory is nice and all, but does it really work? Let’s try it!

And in the response body is a nice JWT you can use.
Now, if you copy this JWT and go to the website jwt.io you can paste it into the JWT.
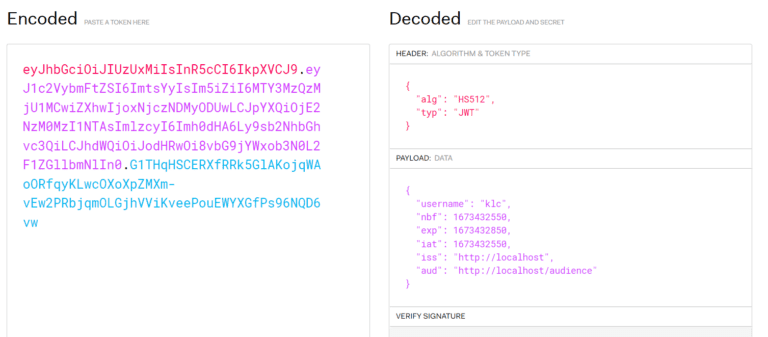
This is just to remind you of the subject and the vulnerability of JWTs. You can see the username clearly in the payload (subject in the token descriptor). You can also see the iss(uer), aud(ience), and the exp(iration).
Now we have a token. Let’s make the mappings require some authorization.
Require authorization
If you open the API and execute the Get (api/movies/), you will see a list of movies. I want to secure this with the token. So the token is needed to access this data. This means that the mapping needs to know authorization is required. We can do this by simply adding the extension method RequireAuthorization() to the mapping:
If you start the API now and try to execute the GET, you will be presented with a nice 500. I was expecting a 401 (unauthorized). But there is an error:
No authenticationScheme was specified, and there was no DefaultChallengeScheme found.
We get this error because we didn’t tell the AddAuthentication which schemes we want to use. There are different schemes and we want to use the ones with JWT.
If you try the GET again, you will get a 401. This is good because we want to limit access to authenticated users only.
Authorize header
If you are using Postman to test your endpoints you can copy the JWT go to the tab Authorization, select Bearer as type, and paste the JWT in the Token field. Easy, right? But if you are using Swagger you can’t do that. You need to tell Swagger you want to authorize. This can be a hassle to realize, but don’t worry; I got you covered. This is an all-inclusive tutorial.
In the Program.cs you see the following line of code:
We can expand this with “some” settings. We need to tell Swagger we are using the JWT scheme, where the token should be placed, some textual nice-to-haves, and add the security requirement. Here’s the complete code:
I wouldn’t change much and don’t ask too many questions about it. Most of the settings should be pretty straightforward.
If you start the API after adding these settings you should get an extra button on the top of the Swagger page

Don’t click Authorize just yet. First, get the JWT from the endpoint “api/login”. Then copy that token. Now you can click the button “Authorize”. This gives a popup with a textbox. Paste the JWT in there. Don’t forget to click “Authorize”. Then click “Close”.
Now, execute the try again. Voila! Secured movies!
Conclusion
There are a few things that I could have done better. The issuer, audience, and security key should be in a settings or config file and be different for different environments. Never use the same key for a development, test, and production environment! This is a security risk.
The token generation could be in its own class and not in the Program.cs. The idea behind the minimal API is to keep it small. Adding a lot of logic doesn’t make it smal(ler).
Users should be in a database and you should ask the database and table if the credentials are correct. Not with a hardcoded username and password.
I would highly recommend using Postman for this. This way you don’t have to authorize again, and again, and again.
But yeah, this is how you secure a .NET 6 minimal API in a nutshell. There are also other ways to achieve this, but I find this the easiest way. It doesn’t require a lot of code and setting up. You set it up once and it works.