In a previous tutorial, I was talking about how to read text from an image. The basic idea was to read the text from receipts, a first step in creating a semi-automated budget app. Today I write about the next step: How can we show the results from Azure Computer Vision on an MAUI Blazor app?
Things you should know
Note: This tutorial is based on a previous tutorial: Azure Computer Vision – Convert image to text. I highly recommend following this tutorial first since it contains the code and information you will need in this tutorial.
For this tutorial you need to know or have the following terms/techniques:
- C# knowledge is a must.
- An Azure Cloud account. Free will do.
- Basic knowledge of Azure Cloud.
- Basic knowledge of Blazor and MAUI.
- Visual Studio 2022 and .NET.
I’m using .NET 6, I advise you to do the same.
Table Of Contents
Recap & Introduction
This tutorial is not about how you can communicate with Azure Computer Vision. For this, I created a different tutorial. But a small recap:
We created a class that handles requests between your local machine and Azure Computer Vision. I explained how you need to set up a Computer Vision resource, get the key and endpoint, and use it in a class.
This class basically sends an image to Azure and receives the texts that are found in the image. We will be reusing this class and changing it a little bit.
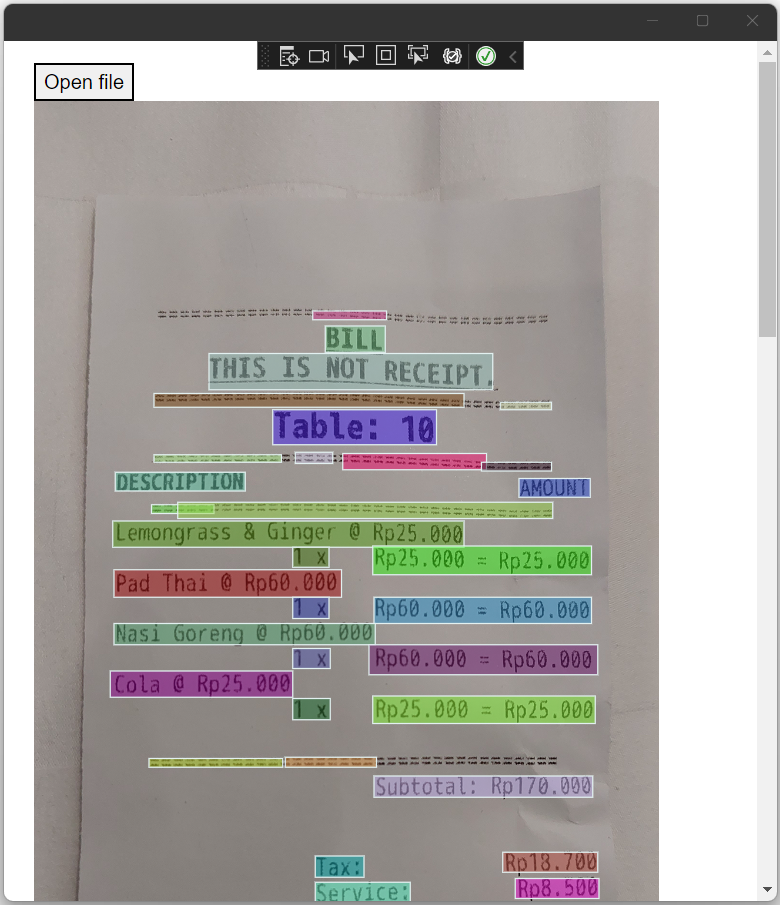
In this tutorial, we will not only read the text, but we want to mark the locations of the texts on an image. I also want to be able to click these locations so I can interact with them. To make this happen I will be using MAUI Blazor.
This is want to achieve:
Complete project
If you don’t want to scroll through the complete tutorial, copy-paste the code, and hope it all works; I uploaded the complete solution to GitHub. You can download it here and see the code.
https://github.com/KensLearningCurve/ReceiptReaderMauiBlazor
Just follow the information in the README.md.
.NET MAUI Blazor App
So why do I use MAUI Blazor? A few reasons:
- In the end, I want to use the application on my Android mobile phone, my wife’s Apple tablet, and Windows (10 / 11).
- It’s mostly based on C# and Microsoft.
- I tried to learn XAML, but somehow it’s not getting to me.
- Blazor is somewhat familiar to me.
MAUI is the new Microsoft way of creating cross-platform applications. Before MAUI we had Xamarin, which is still used and MAUI is built over Xamarin. Even newer is the Blazor Hybrid, which let you build Blazor apps with MAUI.
That’s the short version and this tutorial is not about Blazor Hybrid or MAUI. So let’s create an app!
Create the app
Let’s fire up Visual Studio and create a new project. From the templates list search for and select .NET MAUI Blazor App. Press Next when you have selected it.
In the Configure your new project window, fill in a name – I will be using ReceiptReaderMauiBlazor -, fill in a location of your choice and leave the solution name to its default. Press the button next.
Keep the .NET framework to version 6. You can go for .NET 7 if you want, but I haven’t tested it yet.
Clean up
The new app is now created and it gives us some files which are not needed. Time to clean up!
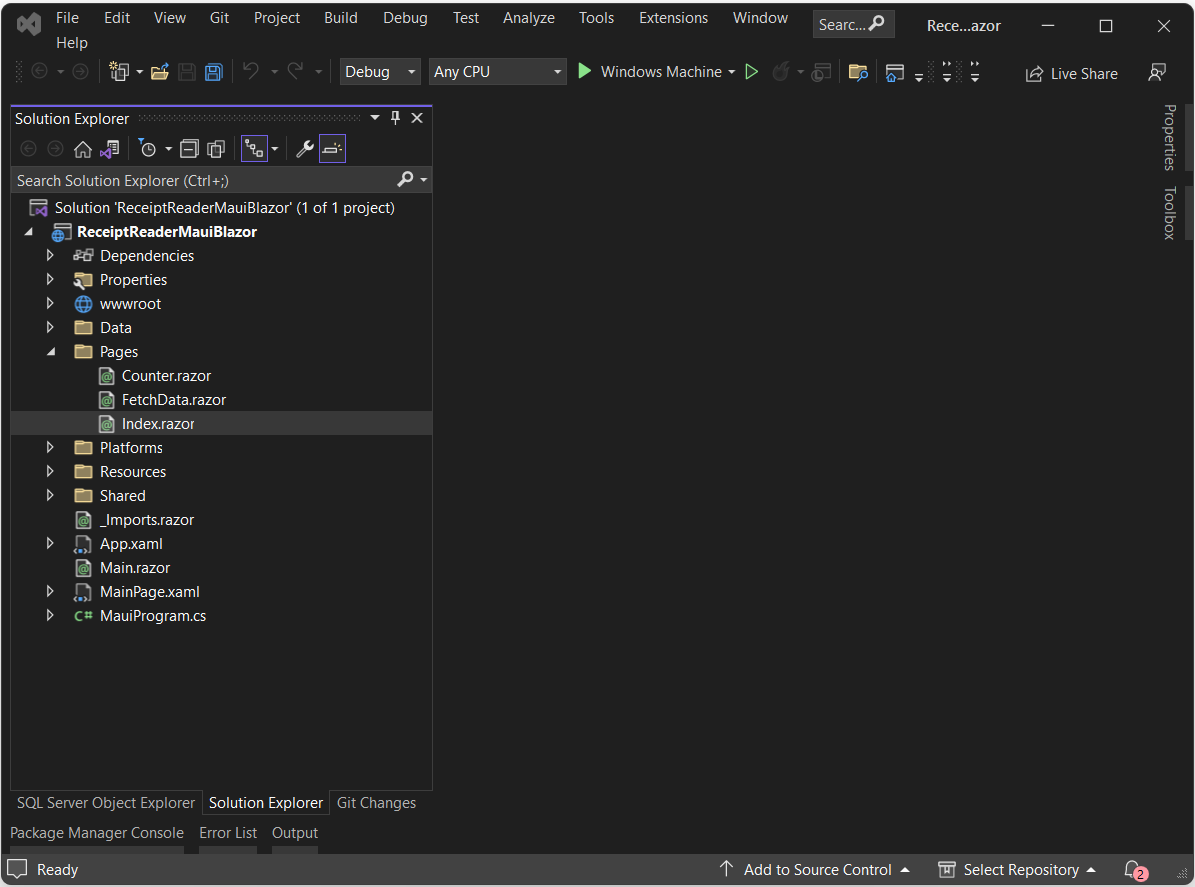
I want to keep the first part of the application very simple. Just a button that allows you to select the image, an image display, and rectangles that show the found text lines. This means I can delete a lot of files and code.
Delete the following files:
- Pages/Counter.razor
- Pages/FetchData.razor
- Shared/NavMenu.razor
- Shared/SurveyPrompt.razor
- Data/WeatherForecast.cs
- Data/WeatherForecastService.cs
Change the content of Shared/MainLayout.razor.
- Remove lines 4, 5, and 6.
- Remove lines 9, 10, and 11.
Change the content of Pages/Index.razor:
- Remove everything except line 1 (@page “/”)
Build and run the application just to check if it still works. It should show a really white page in the application, which is good.
Basic HTML and styling
Let’s add some basic HTML and styling (CSS). Just to be clear: I am no front-end designer, so don’t expect high-end designs from me. First, let’s add a button and the image in the Index.razor.
The DIV will make sure the image will be placed below the button. The image will be loaded from a file dialog, so we don’t have an image when the application starts up. It’s better to check if there is an image instead of showing the no-image-found-icon.
The receipts will be of different sizes. I set the width of the image to 500 pixels. For this, I add a CSS class to the image – receipt – and add the style. As you can see I have set the position as absolute. This helps place the rectangles on the images in a later stage.
Let’s make the code that will open the file.
Open a file with FilePicker
To open an image from a hard drive, we need the FilePicker. A built-in class that helps with opening files cross-platform. I add the following C# code to my code block and make sure the button gets an onclick-event, which points to the method:
Lines 5 to 10 define which file types are allowed for my application. I will be focusing on Windows first, so I only add the WinUI platform on line 8. I added JPG, PNG, JPEG, and BMP to the filter. Feel free to add more.
Lines 12 to 16 are the options for the FilePicker. Line 14 shows the PickerTitle, which is shown in the title bar of the dialog, but not on Windows. Line 15 is the file type, which is defined on lines 5 to 10.
Line 18 is the actual dialog. This will open the FilePicker with the options set on line 12 and shows you the dialog. Here you can browse over your disk and select an image.
If the dialog is canceled the application should stop handling the file, which isn’t selected. Lines 20 and 21 make sure the application doesn’t crash when no file has been selected.
We stop here for now. This method will be expanded in the upcoming chapters.
Let’s put this to the test. Start the application and press that button.
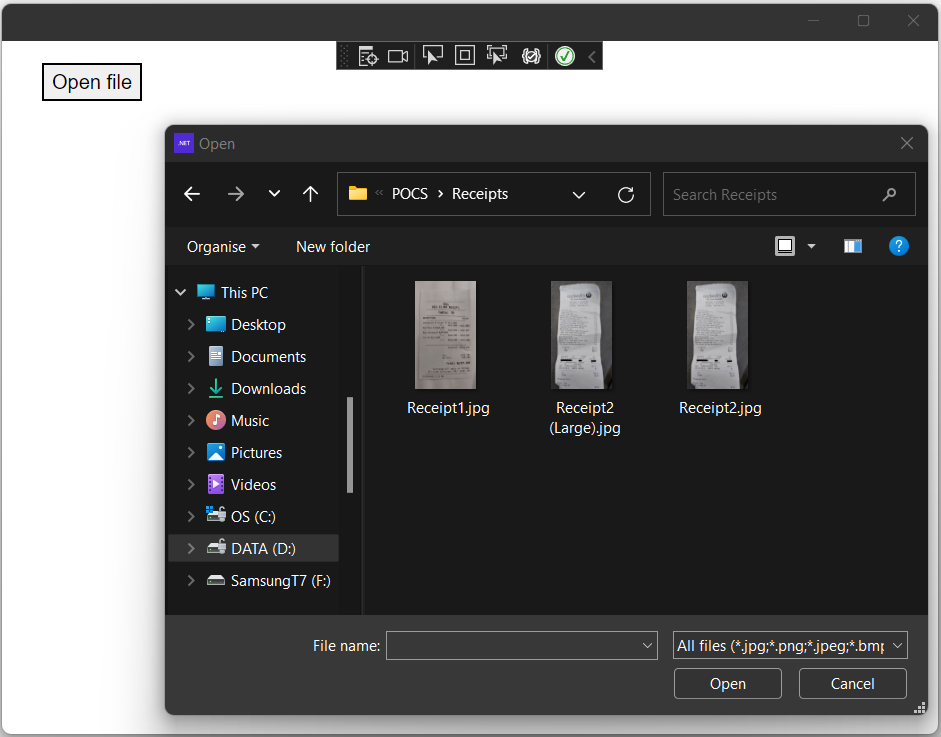
I can now select a file or cancel the dialog. Nothing happens. Let’s change that.
Display the original image
Showing the image is purely to show which pieces of text are found by Azure Computer Vision. The idea is that we can select which part of the receipt we want to use. To display the image in our application we need to convert the ImageSource to a base64 string and load that in the image element.
To achieve this I create a new method in the Index.razor code block, which reads, converts, and displays the image.
Line 3 gets all the bytes from the image, provided by the pathToFile variable. Line 4 converts that array of bytes to a string. And finally, line 5 will add “data:image/png;base64” in front of the string, so the image element in HTML knows it’s an image. This is a common way of showing local images or database-stored images in HTML.
All that remains is calling this method from OnOpenFileClick(). Enter the highlighted line of code at the bottom of the OnOpenFileClick method.
Pay attention to lines 7 to 10. This has nothing to do with reading the image. But it is important. Sometimes changes to the GUI aren’t processed or showing. In this case, we change the content of the variable image. But it isn’t shown if you remove lines 7 to 10. The InvokeAsync might sound familiar. It works with events in C#. In this case, it can invoke the StateHasChanged(). This method tells the GUI to reload the bindings.
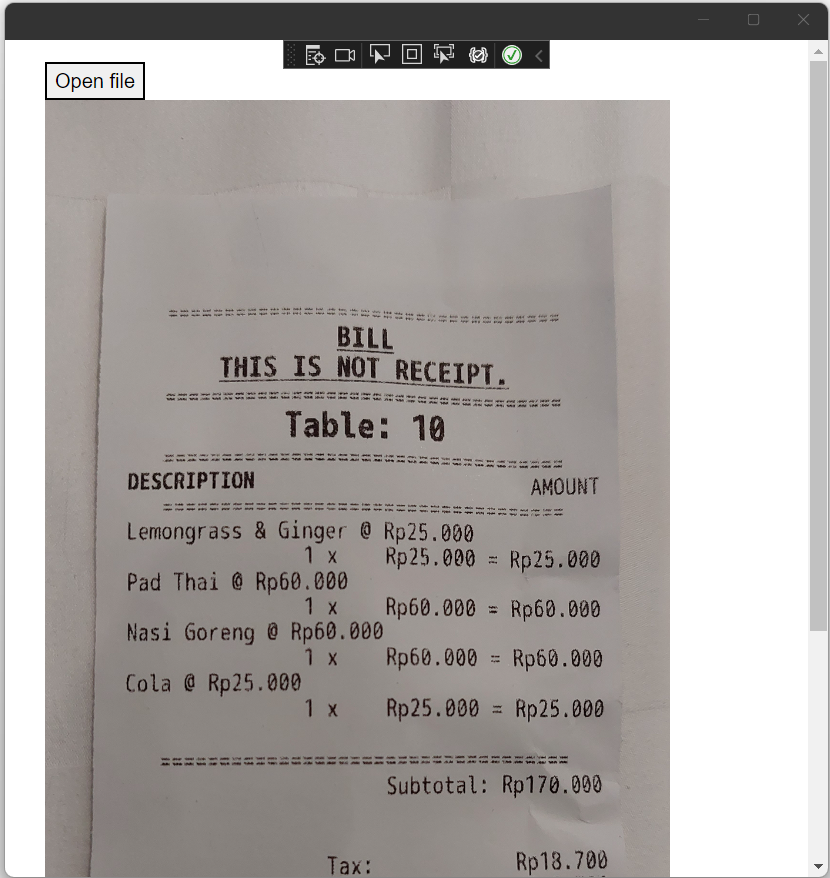
You can now start the application, open a file, and see the image shown on the page.
Get Computer vision result
We now have an image and all we have to do is send this image to Azure Computer Vision, retrieve the results, and place some rectangles on the screen. Easy!
Let’s start by adding the ReceiptReader class from the previous tutorial. It’s not really working for this project since I want to draw rectangles per line in the result. The current ReceiptReader returns a full string with all lines.
First, make sure you install the package Microsoft.Azure.CognitiveServices.Vision.ComputerVision into the application. Then create the ReceiptReader class in the Data folder. You can copy the code from the previous tutorial or use the code below.
Things I changed in the class:
- Removed the override on ToString(). This is not needed anymore.
- Changed Result to private _result on line 6. No need to expose it to other classes.
- The function Read on line 8 returns a ReadResult, holding the found lines. You can see this on line 20. These are used on the Razor page.
Nothing else has changed and it should work.
Let’s go back to the Index.razor. On this page, we need to initialize and use the ReceiptReader class. Place the following code in OnOpenFileClick, after the call to PlaceImage(result.FullPath).
I don’t think this code needs any explanation, right? The variable readResult now holds the information from Azure Computer Vision. This information has the location and coordinates of the found lines of text. All we have to do now is iterate through the lines and draw the rectangles.
Rectangles
To draw the rectangles over the image we need an SVG element. SVG is a vector graphics format that is based on XML and allows us to draw simple and complex figures on a Razor page.
Preparations
First, we need an SVG element. It should be styled with an absolute position. This way it falls over the image. The z-Index is set to 2, making sure it stays on top of the image.
I use the width of the image, which is set to 500px in the CSS, and a height of 2000px. I could calculate the height, but that is not the point of this tutorial. I will cover this in another tutorial.
And the styling:
If you start the application now and select an image, nothing changed. Simply because we aren’t doing anything yet. We draw an empty element on the screen.
The code
Next, we need to calculate where the rectangles should be placed. We will create a model that holds the x position, y position, width, and height. Then we iterate through the found lines and calculate those x, y, width, and height. This will be placed in the model, which will be saved in a list. This way all rectangles are in a list and we can draw them in the SVG element.
Why calculate?
The information on the locations of the lines, and words, are stored in the ReadResult. But these locations (x, y, width, and height) are based on the full size of the image. We resized the image to a width of 500px. This means that the x, y, width, and height from Computer Vision should be resized too.
So, we need to calculate what the shrinking percentage is. This isn’t really rocket science:
The original width of my image is 1063px. This is 100%. The new width is 500px. Thus:
500 / (1063 / 100) = 47,03668861712135 == 47.04
The image has shrunk by 47.04%. This means we will take 47.04% from the given x, y, width, and height.
Discover and save the rectangles
The first step is creating a model named Rectangle. This will hold all the information we need before drawing it to the screen. Create a new class, called Rectangle, and add the following code:
Go back to the Index.razor and add a new variable called rectangles. This is a list with the generic type Rectangle. Place this at the top of your code block. Here we are going to save all the rectangles that should be drawn on the image.
Create a new method called PlaceRectangles in Indez.Razor. This will hold all the functionalities of reading and calculating the locations of the rectangles.
Let’s walk through the code:
Line 2 initializes the rectangles variable. If we change the image the old rectangles will be deleted.
Line 5 starts an iteration through the lines of the result page from Azure Computer Vision, which is given as a parameter to the method. We want to draw rectangles around the lines, not the words.
On line 7 I initialize a new Rectangle. A line (but also a word) of the ReadResult has a bounding box, which is an array of 6 numbers. To be honest: I never really figured out what all 6 numbers are, but I did find out that index 0 is the x axe and index 1 is the y axe. So I can now calculate the new x and y position as explained earlier.
Note: X and Y need to be the whole number. Not because it’s declared as integers, but the HTML rectangles can only contain whole numbers. If decimals are used, the rectangle will not be drawn. I learned that the hard way (…).
The width and height need to be calculated by the X and Y. This is why these calculations are on lines 13 and 14. I found out that BoundingBox index 2 is the width and index 5 is the height.
Last, I add the new rectangle to the list of rectangles on line 16.
To make this all work we need to call this method from OnOpenFileClick, after the variable readResult is set.
Showing the rectangles
Almost done! All that is left is drawing the rectangles on the image. Or in the SVG to be more precise.
Luckily HTML does have a rectangle element, called rect. We have all the rectangle information ready. If we simply iterate through that list (rectangles) within the SVG we should be seeing some rectangles.
Rectangle in HTML
First some code:
Add this code inside the SVG element.
As soon as the list rectangles has changed the for each-loop will be triggered, adding or removing a rectangle on the SVG (which is over the image).
As you can see the rect-element has a CSS class. Here is the code:
First attempt
If you start the application and select an image you will see something like this:
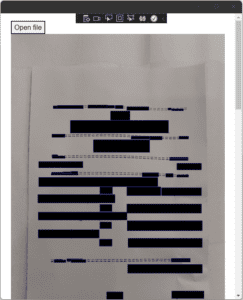
Looks like a highly secret document that has been redacted! The reason is simple: The rectangle has no fill color set. Apart from this; looks pretty cool!
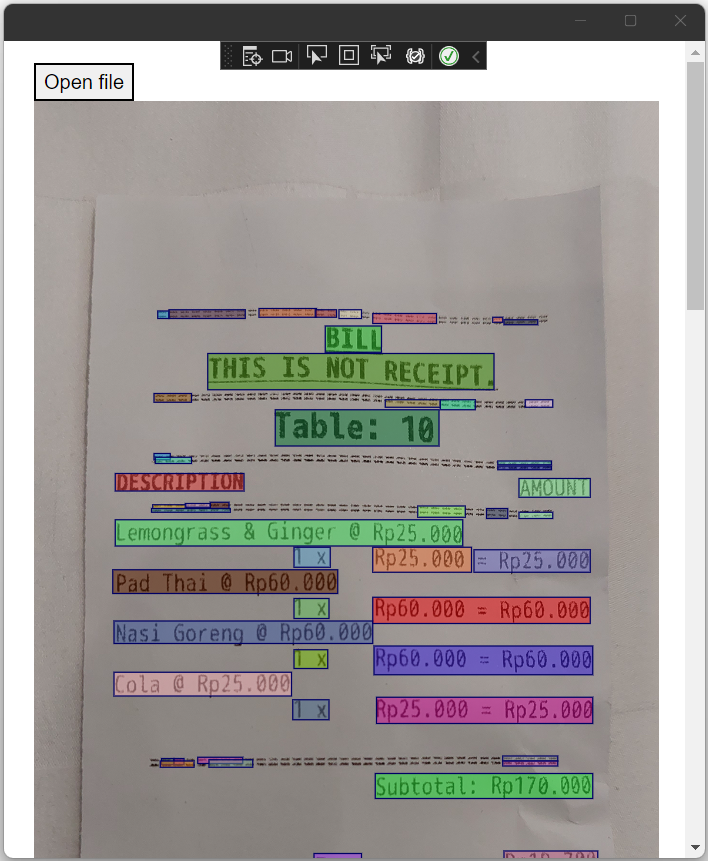
Adding some color
To mark the different rectangles on the image it’s best to use random fill colors. For this, I will be using random RGB colors. These are created with numbers from 0 to 256. Numbers are easy to randomize.
The first step is to add a new property to the Rectangle class called FillColor. This is a string, which will hold a random RGB color.
The next step is to change the PlaceRectangles-method.
On line 4 I add and initialize a randomizer. This will be used to randomly choose a number between 0 and 256.
I added the property FillColor to the Rectangle model and fill it on line 12. Here I use the randomizer. The last parameter of the RGB is the opacity, which I set to 0.5. If you set it to 1 the text under the rectangle wouldn’t be readable.
One thing left to do: Add the FillColor to the HTML rect-element:
Alright! That’s it! Let’s start the application and upload an image.
Clickable rectangles
Last part of this tutorial, you are doing great!
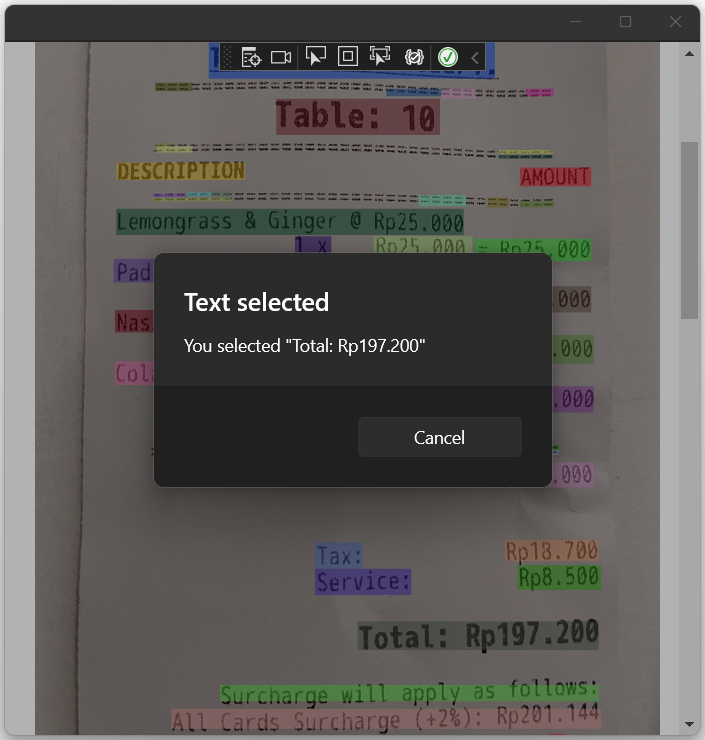
We now have rectangles, but how can we interact with them? What I want to achieve is that I can click on a rectangle and a message box shows the text I have selected.
Onclick event
To interact with an element we can add the onclick event. This is an attribute of the HTML element and it corresponds with a method in the C# code block. Parameters are optional, but if you want to add one, you need to add the MouseEventArgs first.
First, let’s add some C# code. To know which text a rectangle holds we need to add a property to Rectangle: Text, which is a string. Then, in the method PlaceRectangles I fill that property with the text of the line:
Next, I create a new method and call this one OnRectangleSelected. I want to give it the parameter Rectangle, so I have the information of the clicked rectangle. This method will show a message box with the text (Rectangle.Text).
The last part is adding the onclick-event to the HTML rect-element:
Let’s start the application and see what happens when we click on a rectangle.
Conclusion
After I finished this tutorial I realized how much text and code are in here! Sorry about that. But I think you got a clear picture of how to combine the Azure Computer Vision, with reading text from an image, and Maui Blazor. For me, MAUI Blazor was new but pretty easy to understand and work with.
Reading and calculating the positions of the rectangles isn’t hard, but you need to understand which values of the bounding box you need to use and how to calculate the ‘new’ position of the x, y, width, and height.
Adding a click event to an HTML rect element is pretty easy and it helps to move to the next stage of my application: Selecting how to use the values I select on the image.
Like I said before: I am not a front-end developer. I try to avoid CSS as much as I can. So maybe some approaches in Blazor, HTML or CSS aren’t the best and I am open to suggestions.