Creating web applications, such as an API, is cool, but making use of them while they are online is even better! In this article, I am going to show you how you can create continuous integration and continuous delivery with Azure DevOps and Azure Cloud.
Table Of Contents
Goals
The goal of this article is to show you the idea and workflow of continuous integration and continuous delivery. I will show you how to set up a pipeline with Azure DevOps and automatically push changes in a web API to an app service in Azure Cloud.
After this article you:
- Understand the term continuous integration and continuous delivery, or Ci/Cd
- You can create a simple web app in Azure Cloud
- Are able to set up a pipeline in Azure DevOps
- Set up a task in the pipeline to publish a web API to Azure Cloud
Continuous Integration And Continuous Delivery Explained
When you develop software you write a lot of code, run the application(s), create and run unit tests, and more. But when you are done you need to host your application somewhere online. You can compile the code and send the necessary files through FTP to a host. This works for a simple project or when you are working alone or in a small team.
But it gets tricky when you work in a big team, where multiple people are working on the same codebase. It can happen that one person is changing a line of code while you are removing it. If that person is quicker, he or she can upload the changes. When you upload your changes, his or her changes are gone.
To fix this we can automate a lot. From building the code to running unit tests and from compiling the code to publishing the code to Azure Cloud. To make this happen we need some ingredients:
- A location to store the code
- Azure DevOps
- Azure Cloud
- An API to work with
GIT
One of the things that really helps solve this is GIT. It stands for Global Information Tracker and it’s been around for a long time. The idea behind GIT is to store your files somewhere online and others can grab those files, change them, and upload them again.
But when two people are working on the same file, GIT can help merge that file. It will discover changes and merge the two versions into one. But when GIT can’t merge then, it will signal the user to do the merge for it.
GIT has repositories, usually for one project, and each repository has branches. Branches are usually main, development, and test. Main contains the code that is currently the published version that is being used by users. Development is the branch that is being used by developers to add new features. The test branch is the code from development that is being tested. When the testers are happy with it, the test branch is merged with the main.
While using continuous integration and continuous delivery, this is usually where the code comes from. The most known GIT platforms are GitHub, Azure DevOps, and BitBucket.
Azure DevOps
Next, we need something that can create a way to grab the code and do some awesome things with it. Like building, testing, and publishing the code. I will be using Azure DevOps. This decision has a few reasons:
- It’s free
- It supports GIT
- It has a scrum board (yes, I use that)
- It has pipelines for continuous integration and continuous delivery
- Good integration with Visual Studio
Since Microsoft took over GitHub it has a great integration with Azure DevOps.
Azure Cloud
There are a few cloud solutions we could use, but I choose Azure Cloud. It’s not free, but some services are. I have some credits to spend per month to try other services.
Note that you need a credit card to register to Azure Cloud. They will not take any money; it’s for verification only.
The service I will be needing for my API, which is basically a website, is a Web App. This is a service that allows us to host web applications in Azure Cloud.
A web app service is easy to reach through Azure DevOps, which will push the compiled API to the web app.
An API To Work With
To demonstrate how to set up the continuous integration and continuous delivery I will be using an API. With this, we can test if it really works by using its endpoints, and execute unit tests on the logic, and it fits perfectly in an Azure web app.
For demo purposes, I created a very simple .NET 7 minimal API you can use. I will be using this API in this article. You can download the solution below.
Step 1: Web App In Azure
Now that we have all the ingredients we need to put them together. The first step is to create the web app in Azure Cloud.
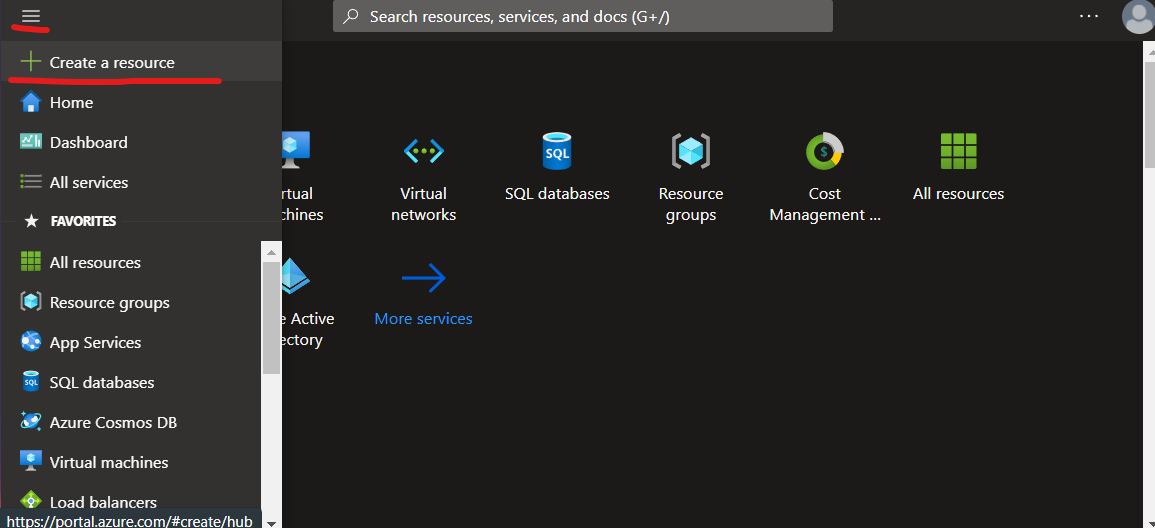
Since this is not a step-by-step guide for Azure Cloud, let’s walk through it. First, log on to Azure Cloud. Create a new resource by clicking on the link in the menu on the left.
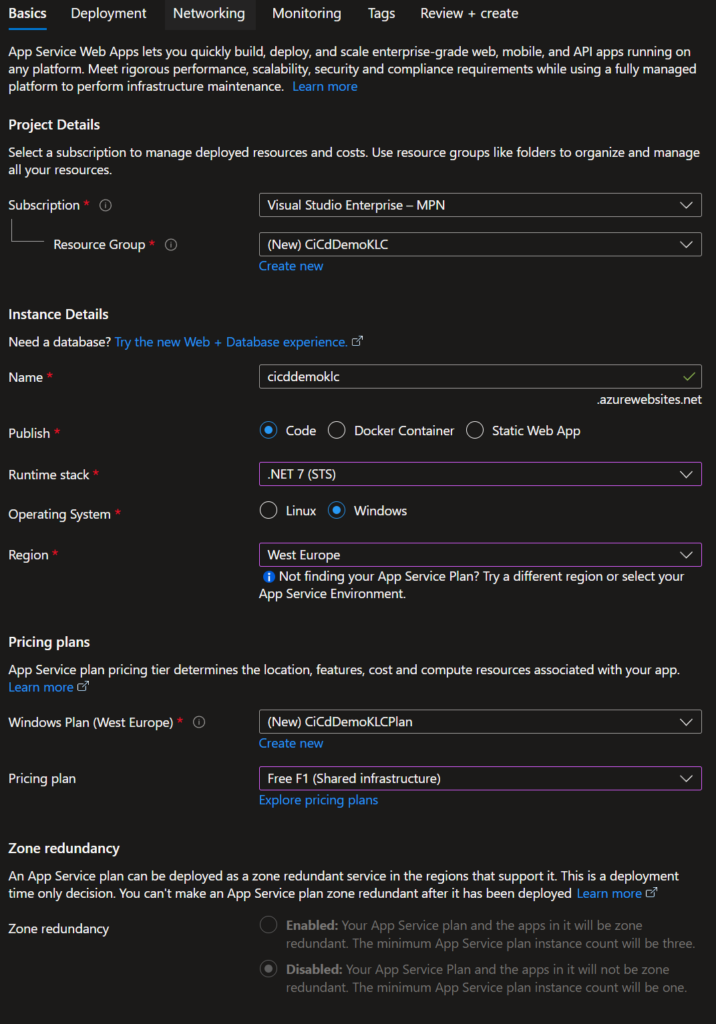
In the new screen search for “Web App” and click Create. Select the subscription you want to use and create a new resource group. If you already have a resource group you want to use, select that one.
Each web app needs a name. Give it a good name, but make sure it’s URL-friendly. The name is also the subdomain where you can reach the web app.
Select the correct runtime stack. The API you can download is created with .NET 7, so select that one if you use that API. Notice the other options and realize what other languages and frameworks are supported (!).
Go down to the region. Make sure you select a region close to your own. The region is where the app will be located. The further away, the slower the connection will be. And there is more to regions, but that’s a story for another time.
Don’t change the pricing plan. If all is correct it should be an F1 plan, which means it’s free (with rules).
Go to the tab Monitoring and disable Application Insights by selecting the radio button no. We don’t need it here. It will only take up more resources.
Finally, go to the tab Review + create, review everything, and press the button Create if you agree with all of it. This could take some time. Maybe a good time for some Coffee?
Testing
After Azure is done setting up your new web app, click on the button Go to resource. Click on the link behind the Default domain. A new webpage will be opened and you should see something like this:

We are done here. Let’s set up Azure DevOps.
Step 2: Azure DevOps
For this part, I will assume you have an account for Azure DevOps. If not, you can create one for free. Then we create a pipeline that will grab the code, execute some to-be-defined tasks, and publish the code to Azure Cloud.
Repository
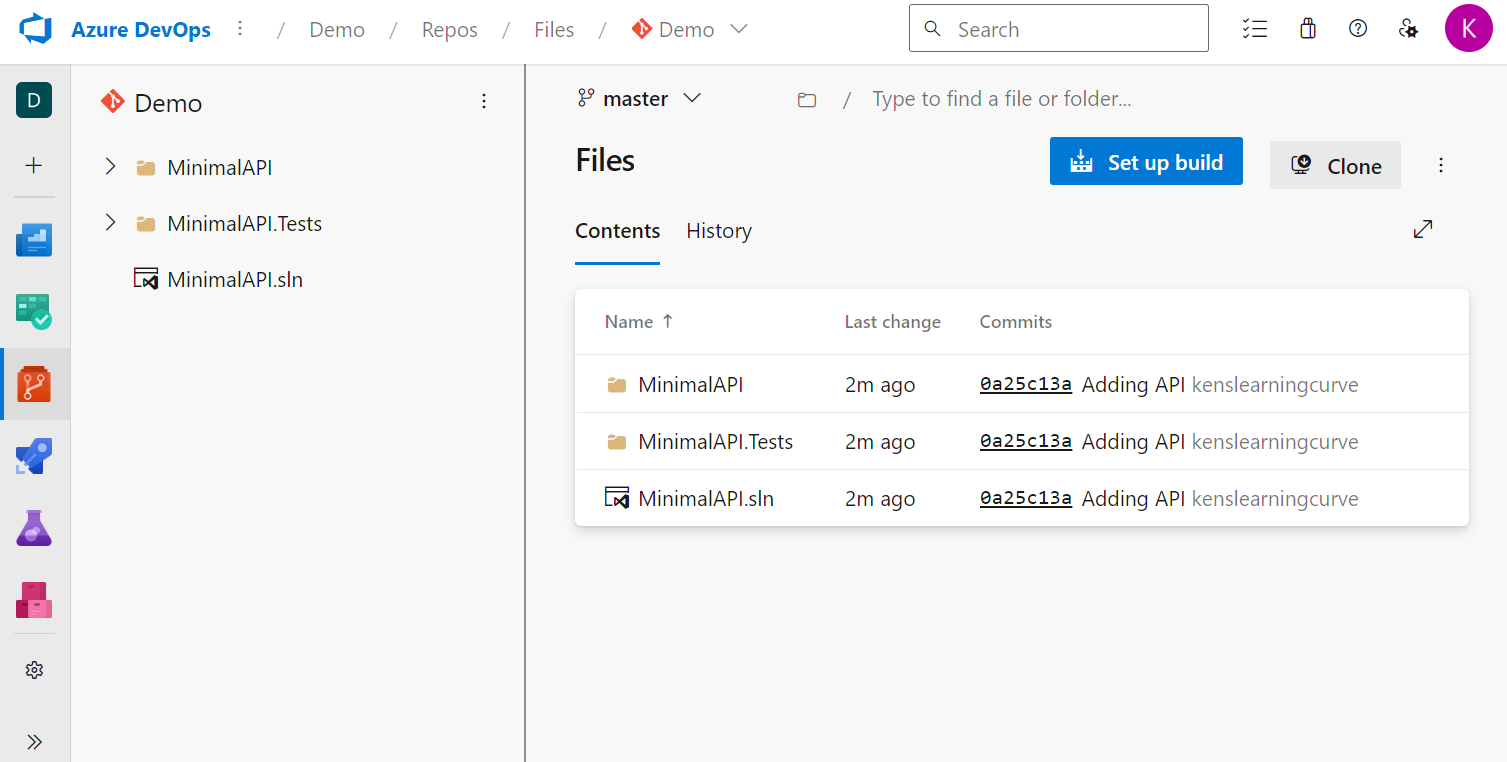
Azure DevOps needs to have access to the code. This code can be placed in different locations, but the most logical one is Azure DevOps or GitHub. I have my API code stored in DevOps.
For this article, you can also use GitHub. The settings are a bit different.
Pipelines
Pipelines are a feature of Azure DevOps and make it possible to do a lot of things. You can schedule them to perform certain actions, like building the code from a repository, running unit tests, sending messages, and publishing the code to an online host like Azure Cloud.
I will keep it short for now, but if you want to know more about pipelines, please click here.
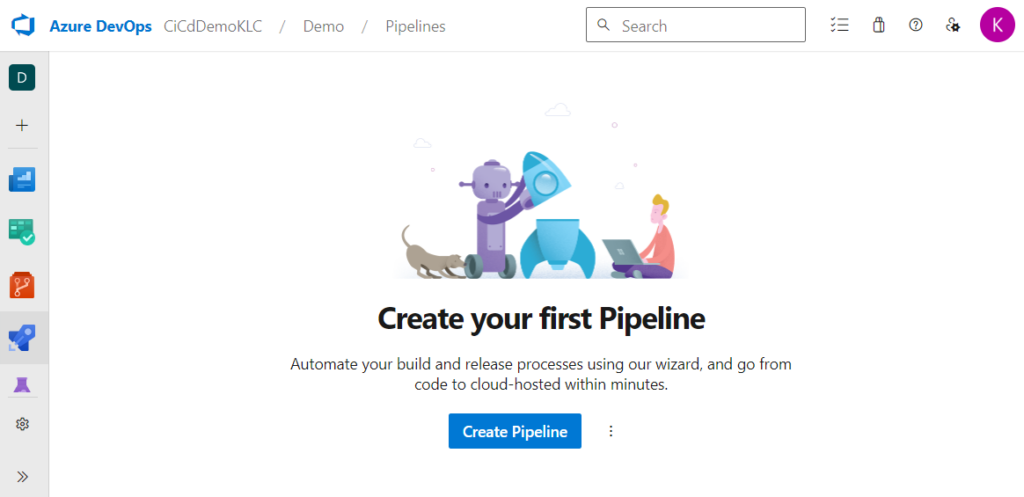
Let’s create a new pipeline by going to the Azure Pipelines. Click on the button Create Pipeline. In the new screen, I select Azure Repos Git. If you use GitHub, select GitHub instead.
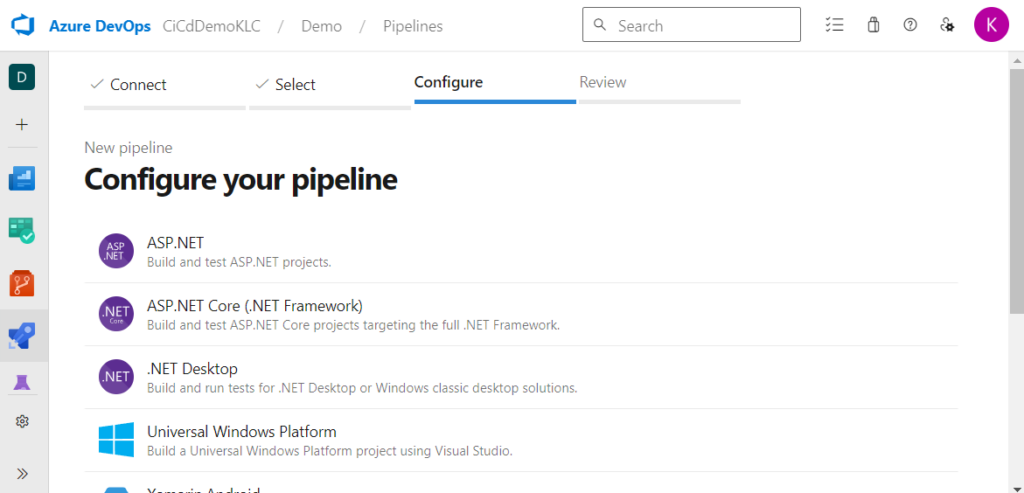
Next, select the repository that contains your code. I have just one repository, so I select that one. After that, select what you want to do. It gives you a list of options that are important to the base configuration of your pipeline. Since the API is a .NET 7 application, I select the ASP.NET. The one with (.NET Framework) is the older, pre-core, version.
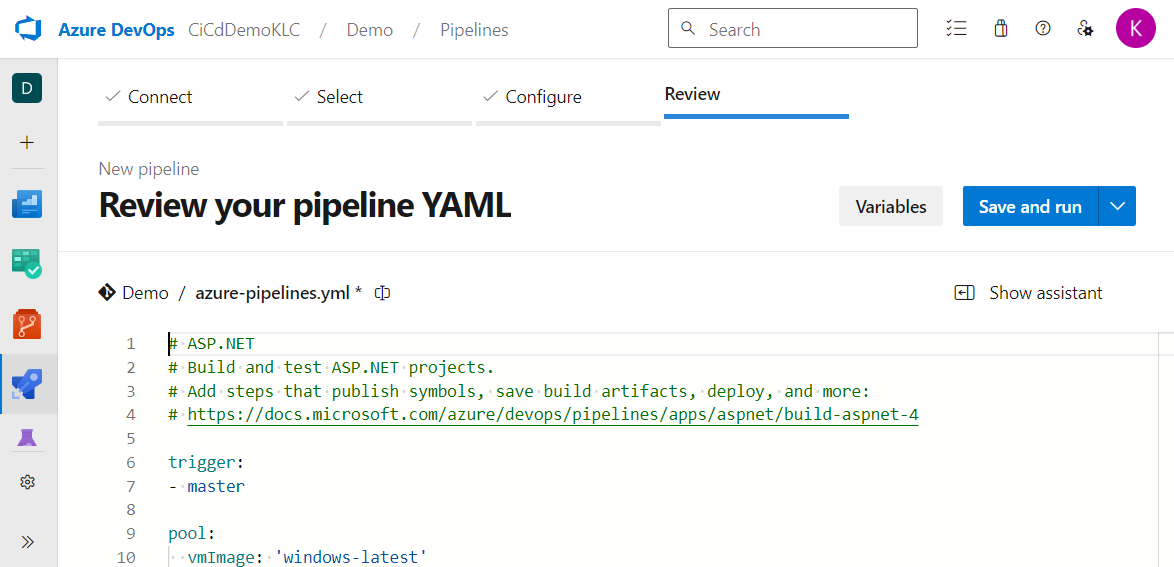
The next screen gives you a big YAML file. This is the pipeline and the tasks that will be executed. Now, I am not a big fan of YAML, since it doesn’t look easy to use. Where Azure DevOps used a great drag-and-drop system to create pipelines, we now go back in time and use command-line-ish commands.
My steps in pictures:

Running – Error
We can save and run the pipeline to see what it does. Click the button Save and Run. In most cases you will get an error:
No hosted parallelism has been purchased or granted. To request a free parallelism grant, please fill out the following form https://aka.ms/azpipelines-parallelism-request
This is because Azure DevOps has had some problems with the usage of the servers. Too many people used them. To avoid this, everyone has to register to use the pipelines per organization. It’s free and all you have to do is fill in the form. It took less than 24 hours for them to approve my request.
After they approve your request, try again. A job will be queued because you are sharing the resources. It could take a while, just be patient. It will be running at some point.

When all is done, go back to editing the pipeline (three dots in the top right corner -> Edit pipeline).
Publish To Azure Cloud
Notice the Tasks on the right side of the screen. Here you can select what tasks you want to add to the YAML file. Most tasks we want are already in the YAML file, except the one that publishes the application to Azure Cloud.
Search for Azure App Service deploy and click it. You will be presented with a set-up screen.

The Connection type is how you want to deploy the application. You can create a publish profile, but we don’t have that. Easier is the Azure Resource Manager (ARM), where you can simply select where you want to deploy the application.
Select the subscription you also used in Azure Cloud when creating the web app. In some cases, you need to authorize the subscription. This is to check if you really have access to the subscription.
If you followed the same steps I showed you when setting up the web app, you will have noticed I selected Windows as an operating system. So it’s important to select Web App on Windows at the App Service type. ARM will look for web apps in your subscription that run on Windows.
Your web app should be listed in the App Service name. Select it here. If you don’t see it, check all the settings again.
Press the button Add. The task will now be added to the YAML file. If the task is placed somewhere in the middle, drag it down. We want to execute this task in the end, after the build and test(s).
Publish Artifacts
Although everything looks really good, it won’t work. If you run the pipeline it would result in an error, telling you it can’t find the zip file. This thing took me a while to figure out, so you won’t have to.
We need to create a zip file, but it already exists. The task VSBuild@1 has msbuildArgs, which are arguments for the MSBuild. You have MSBuild on your computer as well, which is being used by Visual Studio to compile your code. One of the parameters is WebPublishMethod and it has the value Package. We call this package an artifact.
When you look more to the right you’ll see the PackageLocation and the value $(build.artifactStagingDirectory). This means that the package is stored in a predefined location.
All we have to do is publish that artifact to a container and the web app deployment task can grab that artifact (the zip file). To do this, add another task.
Look for the Publish build artifacts task and click it. Keep everything as it is and press Add. Make sure the new task is placed directly above the AzureRmWebAppDeployment@4.

The Whole YAML File
This is what the contents of my YAML file look like:
# ASP.NET
# Build and test ASP.NET projects.
# Add steps that publish symbols, save build artifacts, deploy, and more:
# https://docs.microsoft.com/azure/devops/pipelines/apps/aspnet/build-aspnet-4

trigger:
- master

pool:
  vmImage: 'windows-latest'

variables:
  solution: '**/*.sln'
  buildPlatform: 'Any CPU'
  buildConfiguration: 'Release'

steps:
- task: NuGetToolInstaller@1

- task: NuGetCommand@2
  inputs:
    restoreSolution: '$(solution)'

- task: VSBuild@1
  inputs:
    solution: '$(solution)'
    msbuildArgs: '/p:DeployOnBuild=true /p:WebPublishMethod=Package /p:PackageAsSingleFile=true /p:SkipInvalidConfigurations=true /p:PackageLocation="$(build.artifactStagingDirectory)"'

- task: VSTest@2
  inputs:
    platform: '$(buildPlatform)'
    configuration: '$(buildConfiguration)'


- task: PublishBuildArtifacts@1
  inputs:
    PathtoPublish: '$(Build.ArtifactStagingDirectory)'
    ArtifactName: 'drop'
    publishLocation: 'Container'

- task: AzureRmWebAppDeployment@4
  inputs:
    ConnectionType: 'AzureRM'
    azureSubscription: 'Visual Studio Enterprise – MPN(REMOVED_FOR_PRIVACY_REASONS)'
    appType: 'webApp'
    WebAppName: 'cicddemoklc'
    packageForLinux: '$(Build.ArtifactStagingDirectory)/*.zip'
    platform: '$(buildPlatform)'
    configuration: '$(buildConfiguration)'
You can now run it and test if it works. It works on my DevOps. If you run into any problems, let me know in the comments.
Triggers
The last step is setting a trigger. The whole purpose of this article is to create an automatic continuous integration and continuous delivery. Azure Cloud is set up and Azure DevOps (pipelines) is set up, but there is one more thing to do.
The idea is that as soon as someone pushes code in a certain branch of our repository, the pipeline should run. And that is what makes it a totally automatic continuous integration and continuous delivery.
Go back to editing the YAML file of the pipeline. Next, click on the three dots in the upper right corner. Select Triggers.

A new screen is showing. Here you can change the settings for the triggers.
A trigger is nothing more than a function that will kick off the pipeline when a certain condition is met. It could be scheduled (every 6 hours) or after a build completion.
But what I want to do is set the continuous integration trigger, which is on the right side of the screen. Enabling this shows a few more options. You need to point out which branch should kick off the pipeline when the code changes.
My repository has three branches: Master, test, and develop. Develop is where I work and I change the code a lot. The Test branch is based on the develop branch and when I am done developing a feature, I send the changes to test.
If testing the application with the test branch is successful, I send the code from the test to the Master. And it’s the Master branch that needs to send the code to Azure Cloud.

Don’t forget to press Save & Queue or expand that button and select Save.
Testing The Whole Thing
Let’s open Visual Studio and the solution that is stored in the repository. Make sure you are on the right branch! Master in my case. Change some code that will change the output of the API. Then commit and push the changes to the GIT repository.
After a very short while the pipeline should start and after a long time it should be finished and the changes are pushed to the web app on Azure Cloud.
Steps you can take if something goes wrong:
- Check if the trigger and the branch filter are set correctly
- Make sure you are on the right repository and branch
- Check if the application is sent to Azure Cloud correctly
You can do this by going to the web app service in Azure Cloud and selecting Advanced Tools. Click on Go ->. Then click on Debug Console -> CMD. A list of directories and files is showing. Click on site and then wwwroot. This folder should contain your application. - Let me know in the comments
A Final Note
If your code contains an error, like a type in the syntax, don’t worry too much about getting a broken application sent to Azure Cloud. The whole idea of the pipeline and continuous integration and continuous delivery is to find these kinds of things.
But if you didn’t make a typo, but a mistake in the flow of the application, the unit tests should find this error. And that is one of the reasons you should make good unit tests.
When you make a mistake in the code or when a unit test fails, the build will fail. If it fails it sends you an e-mail and stops the pipeline.
Conclusions
A complete continuous integration and continuous delivery system has a lot of benefits. It can automate the distribution of your application(s) rapidly.
There are other ways and other tools to set up a continuous integration and continuous delivery system, but I find that Azure DevOps has a lot of free tools that do it all for me, but that is personal.
If you are interested in other tools, you should check out Atlassian, which has BitBucket and Bamboo. These work with GIT and C# too.