
We, developers, cannot think for a customer or all the things a user can do. But we can make sure our code works as it should. Therefore, we should test our code. Not the application, but the logic that makes the application work. We call this unit testing with C# and .NET.
While coding is fun and all, you need to make sure your code is always working. When something goes wrong, customers usually look at the developers, but 7 out of 10 times it is a wrong input but the customer. 2 out of 10 times it’s a logic problem (“well, didn’t see that one coming”), and 1 out 10 times it’s a developers error.
Table Of Contents
Introduction To Unit Testing With C# And .NET
Testing software is really important for different reasons. You don’t want your users to run into any kind of strange behavior. We test our software to make sure the application(s) work as intended. We also test to filter out the errors and unlogical flows.
There are many ways to test an application. The most known way is to simply start up the application, click around, enter some random data, and hope everything works. This is usually done by dedicated testers; people who had the education to find errors.
But since I am a developer (and chances are you are too) I don’t want to click around and test my application… Although I should. The problem is users don’t know the happy flow of an application. The same goes for dedicated testers.
What happens if you enter 100.00 instead of 100,00 in an application? Should it be 100 or 10000? Can it give an exception to one of the two?
Usually, these kinds of things are fixed in the logic of an application. But a developer usually doesn’t think about 100.00 or 100,00, but a tester does.
A good way to avoid stupid things like this is to (a) get clear documentation of how the application should work and (b) create unit tests. Unit testing with C# and .NET is made by code. Developers know what goes in and comes out of a method. With unit tests, we can prove those methods do what they are meant to do.
A few benefits of this kind of testing:
- We can submit proof the method works as it should and the front-end team should make a validation on something.
- When we change code in another class and it breaks the functionality of a different class, we find it by testing both classes.
- If set up right, code can not be released as long as some unit tests are not working.
Unit testing with C# and .NET has more benefits and it can help you focus on programming. A good technique is TDD (Test Driven Development). But this tutorial is not about TDD, but it could be worth it to look it up.
XUnit vs NUnit
Unit testing with C# and .NET is done with a framework. There are several frameworks you can use, but we will stick to the Microsoft frameworks. Within the Microsoft world, there are two frameworks we can use for unit testing: nUnit and xUnit. Although they both have the same goal (testing) there are some differences. See the table below.
| NUnit | xUnit | |
| Released | 2002 | 2007 |
| Test Declaration | [Test] | [Fact/Theory] |
| Setup & TearDown | Yes | No |
| Documentation | Good | Good / Not good (depents on who you ask) |
| TDD | Not really | Yes |
| For framework | .NET and earlier | .NET Core and above, but also older versions. |
There are more differences, but this is not a tutorial about xUnit vs nUnit. Since I am using .NET 6 I will be using xUnit in the following chapters.
Preparations
Before I start explaining unit testing with C# and .NET, let’s begin with some code to test. You can simply download or clone the code from GitHub: https://github.com/KensLearningCurve/UnitTestingWithCSharp
The solution in this repository contains everything we need. It’s a basic Class Library with a class that handles all movies and a model that represents a movie structure.
The data of this class library is stored in the MyMovies.cs, so it’s hardcoded. This should not be a problem or issue, since the focus is unit testing.
Let’s take a look at the code. What do we want to test? In short: The MyMovies.cs. Why? Because it is code we control and created (yes, I made it, but let’s assume you made it again). And that’s the basic rule; only test code you created or control.
You have not created the class Console or the keyword string, so you don’t make unit tests for these. These are proven pieces of code of the framework, so why test them?
If you work in a team only test your code. Don’t test the work of others, unless agreed to. Each member is responsible for his/her code.
What Do We Test?
I think I can better tell you what we don’t test.
As said before, we only test the code we made ourselves. 3rd party libraries are not something we should test. If you use these you can assume they work as they should. If not, complain to the developer, and don’t try to fix them yourself. Unit testing with C# and .NET only works in your favor when you test the code you can reach and change.
Another thing we usually don’t test is the front end. Although it is possible to use automated testing for a front-end (web, WinForms, etc.) it’s not a part of unit testing. Front-end usually needs a database or other external sources. You don’t have access to these when running tests on a pipeline or with continuous integration and deployment.
If you use repositories (communication between external sources like a database and your application) you don’t test these. Repositories usually don’t have a lot of logic. They just transfer data.
Models, objects, and entities are also not something you want to test. If you make correct unit tests, these objects are tested while testing other logic.
So, what’s left? … Classes! Also called your business or business logic. These classes usually contain the brains of your application. Making all kinds of decisions, gathering data, returning that data, or handling other logic. Classes in your project are made by you so you are in control.
But data from a repository is called from these classes, right? Right! To avoid this, we mock these classes.
With that said it is important to know we only test one class at a time. So if you have a class that uses another class, you only test the first one. You test the second class apart.
I use this rule: Did I create it? Does it contain logic? Yes? I test it!
Creating A Test Project
Let’s assume you created the MyMovies.cs. Great, now we can test it. But where to start? Unit testing with C# and .NET starts with creating a test project. In the solution explored, right-click on the solution “ExampleClass” and select Add -> New Project. Find the “xUnit Test Project” template. Make sure you select the one for C#.

Press next to continue.
Give the project a good name. I usually type the whole name of the project that contains the classes I want to test with “.Tests” behind it. In this case, that’s “ExampleClass.Tests”. Click next. Make sure to have .NET 8 selected (.NET 6 and 7, or even older, will also work). Click Create.
Visual Studio will now create a new project, which is a class library with extra packages.

In the Solution Explorer, a new project has been added. This project has two files:
- UnitTest1.cs
This is an example unit test. Don’t bother checking it out, because we will delete it shortly. - Usings
You will create multiple unit test files that could use the same usings. To avoid using the same using several times, you can put it in this file.
Okay, cool. Now we have a test project! Let’s make some tests!
Making The First Test
First things first: Let’s delete the UnitTest1.cs. It’s just a piece of scaffolded code that isn’t doing much.
Next, create a new class within the test project. Let’s call this MyMoviesTests.cs. This class will contain all the tests that we can make for the MyMovies.cs. In the MyMoviesTests.cs we make a new method.
While unit testing with C# and .net, you create test methods, which are marked with the attribute [Fact] or [Theory]. The attribute Fact indicates this test is always true, no matter what. Unless something goes wrong and the test fails. The [Theory] attributes are only true for a particular set of data.
Fact
But let’s start easy and with a [Fact]. We will test the method Get() of the MyMovies.cs. Let’s create a new method in the MyMoviesTests.cs:
[Fact]
public void Should_ReturnThreeMovies()
{

}
The name of the test method tells me a lot: This test should only succeed when 3 movies are returned from the MyMovies class. Thus it is important that the name is short, but tells you everything. A name like ‘it_just_works’ is short but doesn’t say anything about what the test tests.
Next, we will initialize the MyMovies class. We can’t do anything if we don’t initialize it. After initialization, we can call the GetAll() method. This method returns an IEnumerable, thus we need to cast it to a list (ToList()). We put the result of the GetAll() in a variable.
[Fact]
public void Should_ReturnThreeMovies()
{
    MyMovies myMovies = new();

    List<Movie> result = myMovies.GetAll().ToList();
}
Although this looks good it is not a unit test yet. Unit tests run in the background and we don’t see what it is doing. Therefore we need to add assertions. Checks that validate data and fail when it is not correct. Assertions can check data when an application runs. Depending on the need of the developer, it checks if the data is correct (true) or incorrect (false).
Assertions
Another important part of unit testing with C# and .NET is assertions, also called “assert”, which is a class within xUnit. It has many methods. But before I tell you which ones are the most used, let’s add an assertion to our test.
[Fact]
public void Should_ReturnThreeMovies()
{
    MyMovies myMovies = new();

    List<Movie> result = myMovies.GetAll().ToList();

    Assert.Equal(3, result.Count);
}
Assert.Equal checks if the expected result (first parameter) matches the actual result (second parameter). If it does, the test is good. If the first and second are not correct, your unit test will fail.
We always put the expected result first. This is because of the error handling. If the unit test fails the message will be “Expected [ExpectedValueHere], Actual [ActualValueHere]”.
If you switch the expected and actual parameters, the messages don’t make sense anymore.
Different Asserts
In the previous example, I used the Assert.Equal, which checks if the expected value is the same as the result. But Equal is not the only method we can use. Some other well-used methods for Assert:
| Assert.True | While check if an exception is being thrown. It is generic and you can specify which exception is expected to be thrown. Throws<T>() will return the exception so you can check the message of the exception. |
| Assert.False | Same as the Assert.True, but it checks if the condition equals false. It will fail when the condition results in true. |
| Assert.Throws<T> | While checking if an exception is being thrown. It is generic and you can specify which exception is expected to be thrown. Throws<T>() will return the exception so you can check the message of the exception. |
| Assert.NotEqual | Check if the given variable (the result) is NULL. |
| Assert.Null | Checks if the given variable (the result) is NULL. |
| Assert.NotNull | The opposite of Assert.Null. It should fail when the result is NULL. |
Test Explorer
We have our first test and we got a little more information about creating a unit test. But how can we check it? The best way is to use Test Explorer. This is a build-in window of Visual Studio. You can find it by going to Test -> Test Explorer or the search option.

The Test Explorer shows all the tests within the solution. You see the namespace (ExampleClass.Tests), project (ExampleClass.Tests), test-class (MyMoviesTests), and the test (Should_ReturnThreeMovies). You can choose a different grouping if you want. It’s the fourth button from the right.
To run a test simply click the green play button, the second from the left. This one is simply called ‘run’. This will run the selected group or test. So if you have the namespace selected it will run all the tests within the namespace. If you select a single test it will only run that test.
The button left of the run button will run all the tests that you have selected. I would recommend using this button instead of the run button. This way you know whether all the tests still work, or not.
The test in the image above is blue with an exclamation. This means this test hasn’t been run yet. Let’s run it and see what happens.

Failed Tests
Nothing special here, except the test is green. And this is good. It means the test is successful. When you select the test you see some information about it. When it is successful nothing special is shown here. It is a different story when it fails.
Let’s make the test fail by changing the expected result of the test from 3 to 4:
[Fact]
public void Should_ReturnThreeMovies()
{
    MyMovies myMovies = new();

    List<Movie> result = myMovies.GetAll().ToList();

    Assert.Equal(4, result.Count);
}
Let’s run the test again and check the result.

Everything is red now. The Test Detail Summary has way more information now. It tells us where it went wrong and how. In this case, it tells us the Assert.Equal has failed, because it expected 4, but is 3. Remember I told you to put the expected first and actual last in the Equal-method? Well, this is the reason. If I had turned it around the Equal-method would have expected 3, but got 4, which isn’t true.
Let’s fix this unit test. Double-click on the test name in the test overview. You can also click on the link in the stack trace, mentioned in the Test Detail Summary. Both ways bring you to the test. Change the 4 back to 3 and run the tests again. All green now!
Second Unit Test
Let’s create a second test. In MyMovies.cs is a method called Get(int id). This method gets a single movie with a specific ID and returns it. I can think of different scenarios that could happen:
- What happens when the id is 0?
- What happens if the id is lower than 0?
- What happens when the movie is not found?
- What happens if the movie is found?
If you check the code, the first three questions will return null. The last question will result in an initialized and filled Movie object.
These are unit tests. Let’s create these in MyMoviesTests.cs.
[Fact]
public void Should_ReturnThreeMovies()
{
    MyMovies myMovies = new();

    List<Movie> result = myMovies.GetAll().ToList();

    Assert.Equal(3, result.Count);
}

[Fact]
public void Should_ReturnNull_When_IdIsZero()
{
    MyMovies myMovies = new();

    Movie result = myMovies.Get(0);

    Assert.Null(result);
}

[Fact]
public void Should_ReturnNull_When_IdIsLessThanZero()
{
    MyMovies myMovies = new();

    Movie result = myMovies.Get(-3283);

    Assert.Null(result);
}

[Fact]
public void Should_ReturnNull_When_MovieIsNotFound()
{
    MyMovies myMovies = new();

    Movie result = myMovies.Get(999);

    Assert.Null(result);
}

[Fact]
public void Should_ReturnMovie_When_Found()
{

    MyMovies myMovies = new();

    Movie result = myMovies.Get(2);

    Assert.NotNull(result);
}
It looks the same as the first test we made but with more tests. These all succeed. But there is a small issue: duplicate code violation:
- Should_ReturnNull_When_IdIsZero()
- Should_ReturnNull_When_IdIsLessThanZero()
- Should_ReturnNull_When_MovieIsNotFound()
These three do the same thing: Send an invalid ID to the method, which returns NULL. There is a way to fix this and make it more beautiful.
Theory
As said before, the theory works with a particular set of data. It can help us re-use test methods. The theory attribute works with another attribute; InlineData. This attribute contains the data that is being injected into the test method. We can inject different invalid IDs in one unit test. Here is an example:
[Theory]
[InlineData(0)]
[InlineData(-473)]
[InlineData(999)]
public void Should_ReturnNull_When_IdIsInvalid(int id)
{
    MyMovies myMovies = new();

    Movie result = myMovies.Get(id);

    Assert.Null(result);
}
I added a parameter to the unit test, which is filled with the InlineData. The type of value in the inline data should be the same as the parameter type. You can add more parameters if needed.
Next, I have used the id parameter as a value for the myMovies.Get(int id) method. You can add more parameters if needed. As long as the number of values is the same as the number of parameters.
If you look at the Test Explorer you will see a test with the name Should_ReturnNull_When_IdIsInvalid with an arrow. You can expand this, showing the same unit test again, but with the different IDs behind it.

Debugging
It is also possible to debug your code while running unit tests. This way you don’t need any front-end application to test your application. Besides that, you can check why a test fails.
Debugging works the same as debugging a normal application. You simply place a breakpoint at some line and run the unit test. If you don’t run it normally, you start a debug.
To start a debug you click on the arrow, right next to the run button. This will give you different options on how you can start the selected test(s). Choose ‘Debug’. Visual Studio will now compile and start your code in debug mode and stop at breakpoints or exceptions when needed.
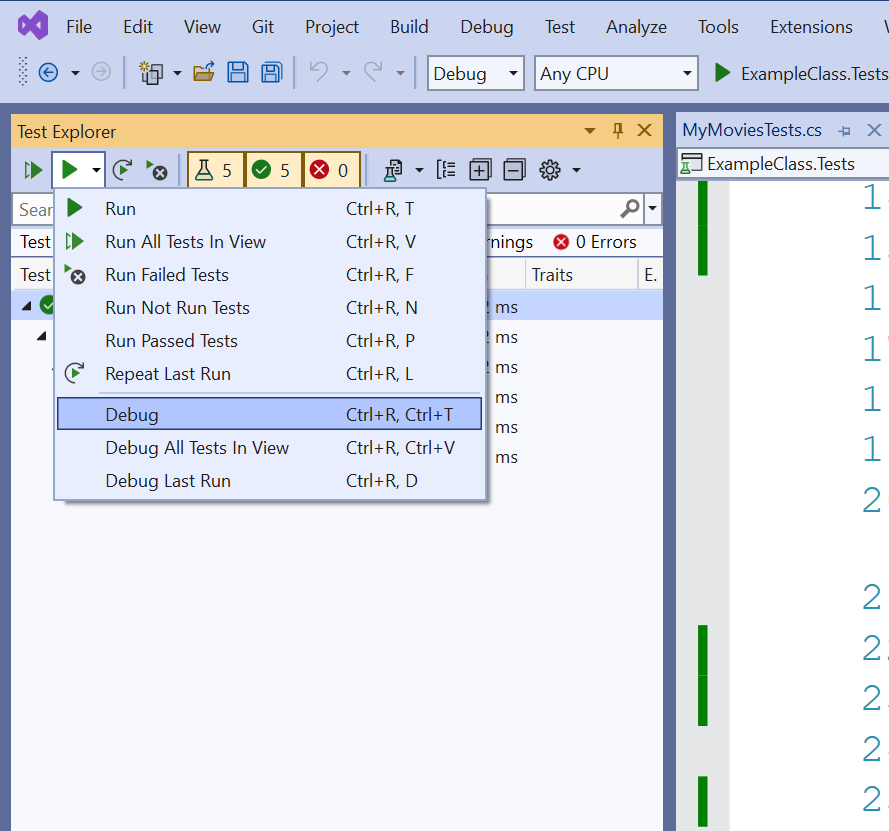
There is nothing special about debugging a unit test, except how to start it. You can walk through the code by using the step-in (F11) and step-over (F10) buttons.
Conclusion On Unit Testing With C# And .NET
Well, that’s the basics of unit testing with C# and .NET. It’s not that hard when you think about it. The hard part is keeping your unit tests up to date and making them when you make new codes in your classes. Most developers forget to make them.
But it is important if you want to make sure your code is always working, with a happy flow. This saves a lot of time and frustration when customers start to complain about something you could have avoided.


3 comments
Thank you! Glad you liked it. The base of readers is growing rapidly.
Great explanation. I was needing a starter tutorial and I think I found it. thank you
Nice article! Found some answers I was looking for.