One of the few things I don’t like is that Angular applications need a (C#) API or something to store and retrieve information. It’s a front-end, meaning it doesn’t have access to native databases. That made me look around and find Google Firebase. And not Firebase in general, but the Cloud Firestore, which is a part of Firebase. In this article, I want to show you how you can create and use Cloud Firestore with Angular TypeScript.
Table Of Contents
Cloud Firestore With Angular In A Nutshell
There are a lot of database types out there, but we only know a few by heart. The most common types are MySQL, MSSQL, Oracle, and NoSQL. The first three are relational databases, NoSQL is not. NoSQL is a non-tabular database and works differently than a relational database.
The structure of a NoSQL is also different from system to system. While the most common style is a key-value pair, there are also more complex NoSQL systems.
Why are we talking about NoSQL? Because Cloud Firestore is a NoSQL cloud database. It is part of Firebase, which is part of the Google Cloud. It’s especially useful for mobiles, web applications, and much more. You can also use it with C# if you want.
Cloud Firestore comes with some impressive benefits. A few:
- Realtime updates
- Querying
- Option to run Cloud Firestore local
(For development purposes for example.) - Pretty easy to set up
- Very fast
- Cloud or serverless
- Cost efficient
(Not my experience, since I use the free version, but the price calculations aren’t bad.)
Angular (TypeScript and JS) can’t use a native database, such as MySQL or MSSQL. In most cases, there is an API that will handle the data. But an API also needs maintenance and if you just want to store some data it will be overkill. And that’s why Cloud Firestore with Angular could help.
In this article, I will be explaining how you create a Firebase account, create a Cloud Firestore database, and use that Cloud Firestore with Angular.
Creating A Firebase Account
To use Cloud Firestore with Angular, we should create a Firebase account first. Firebase has made it really simple to create a project, add a database, and add items to said database.
First Steps – Create A Project
The very, very, very first step is… Go to https://console.firebase.google.com/. This is where Firebase is located and where you start your Firebase adventure.
When you don’t see this screen it means you are not logged in yet. I highly suggest using a Google account for this. You can create one fairly simple and quick.
Let’s hit that ‘Create a project’ button to create… Well, a project. A project can be described as a container of parts of your application. Each part inside a container can share features. Try to think ahead and decide which parts you might use. No need to panic though; you can add parts to the project as you go.
I will call my project FireBaseDemoKLC. Accept the terms and the promise you will only use this feature exclusively for purposes relating to my trade, business, craft, or profession. I have no idea what else you want to use it for. It’s not that I will use it to bake cakes… Anyway…Click continue.

Note the strange name with a pencil under the project name. I will come back to that later.
The next part is about Google Analytics. Without going into much depth… Just disable it for now. We won’t use it. You can use it to add more functionality than Analytics is offering. Not interesting enough for this tutorial. Click “Create project”.
Time to get some coffee, because it could take a little while. But at some point:
Creating Cloud Firestore
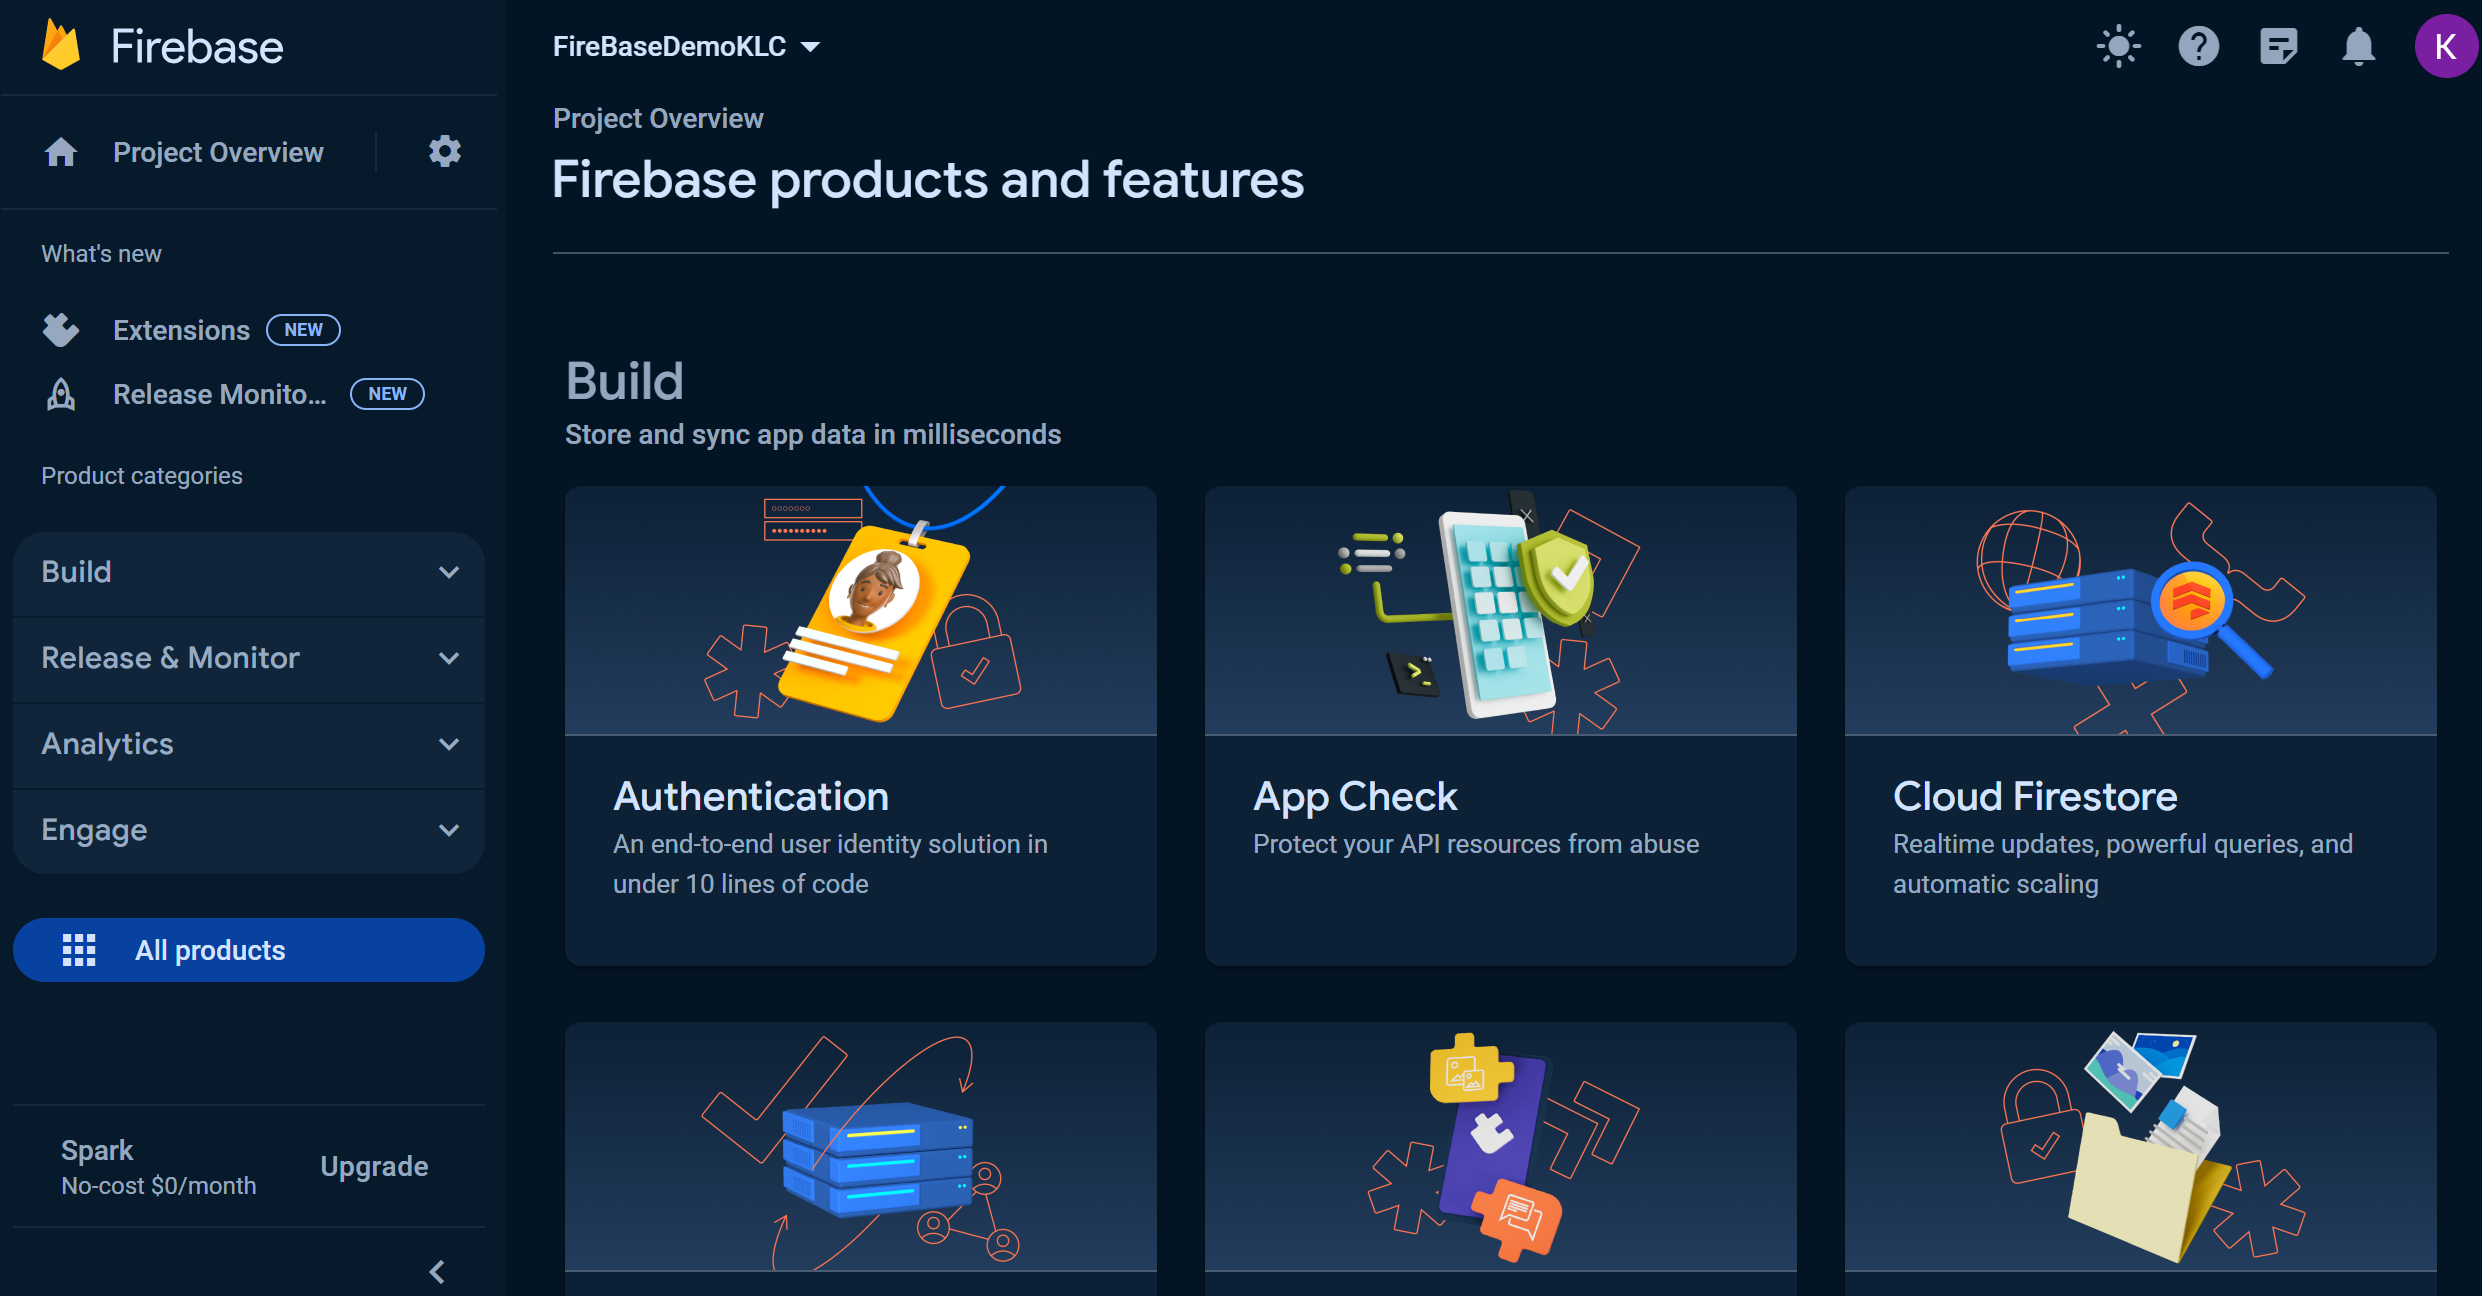
At this point, you have only a Firebase account, nothing more. Let’s create the Cloud Firestore database and use it to store some items. To add this part to your project, select “All products” and then select “Cloud Firestore”.
On the next screen, hit the “Create database” button. This will show a popup.

The database ID is disabled because it will be generated for you. Don’t worry about it. Something that you should consider is the location. Cloud (Google, Azure, Amazon) works in locations and the nearer the location. the better the connection. If you choose a location on the other side of the world there could be lag. From personal experience; I never experienced this. Choose the best location. For me, that is somewhere in the west of Europe. Press “Next” when you are done.
Setting rules and stuff can be a bit overwhelming. For now, let’s keep it simple and select “Start in test mode”. This basically means there is little security. This is ideally for testing your application, not for production. Click on “Create” to create the Firestore database.

Adding Some Data
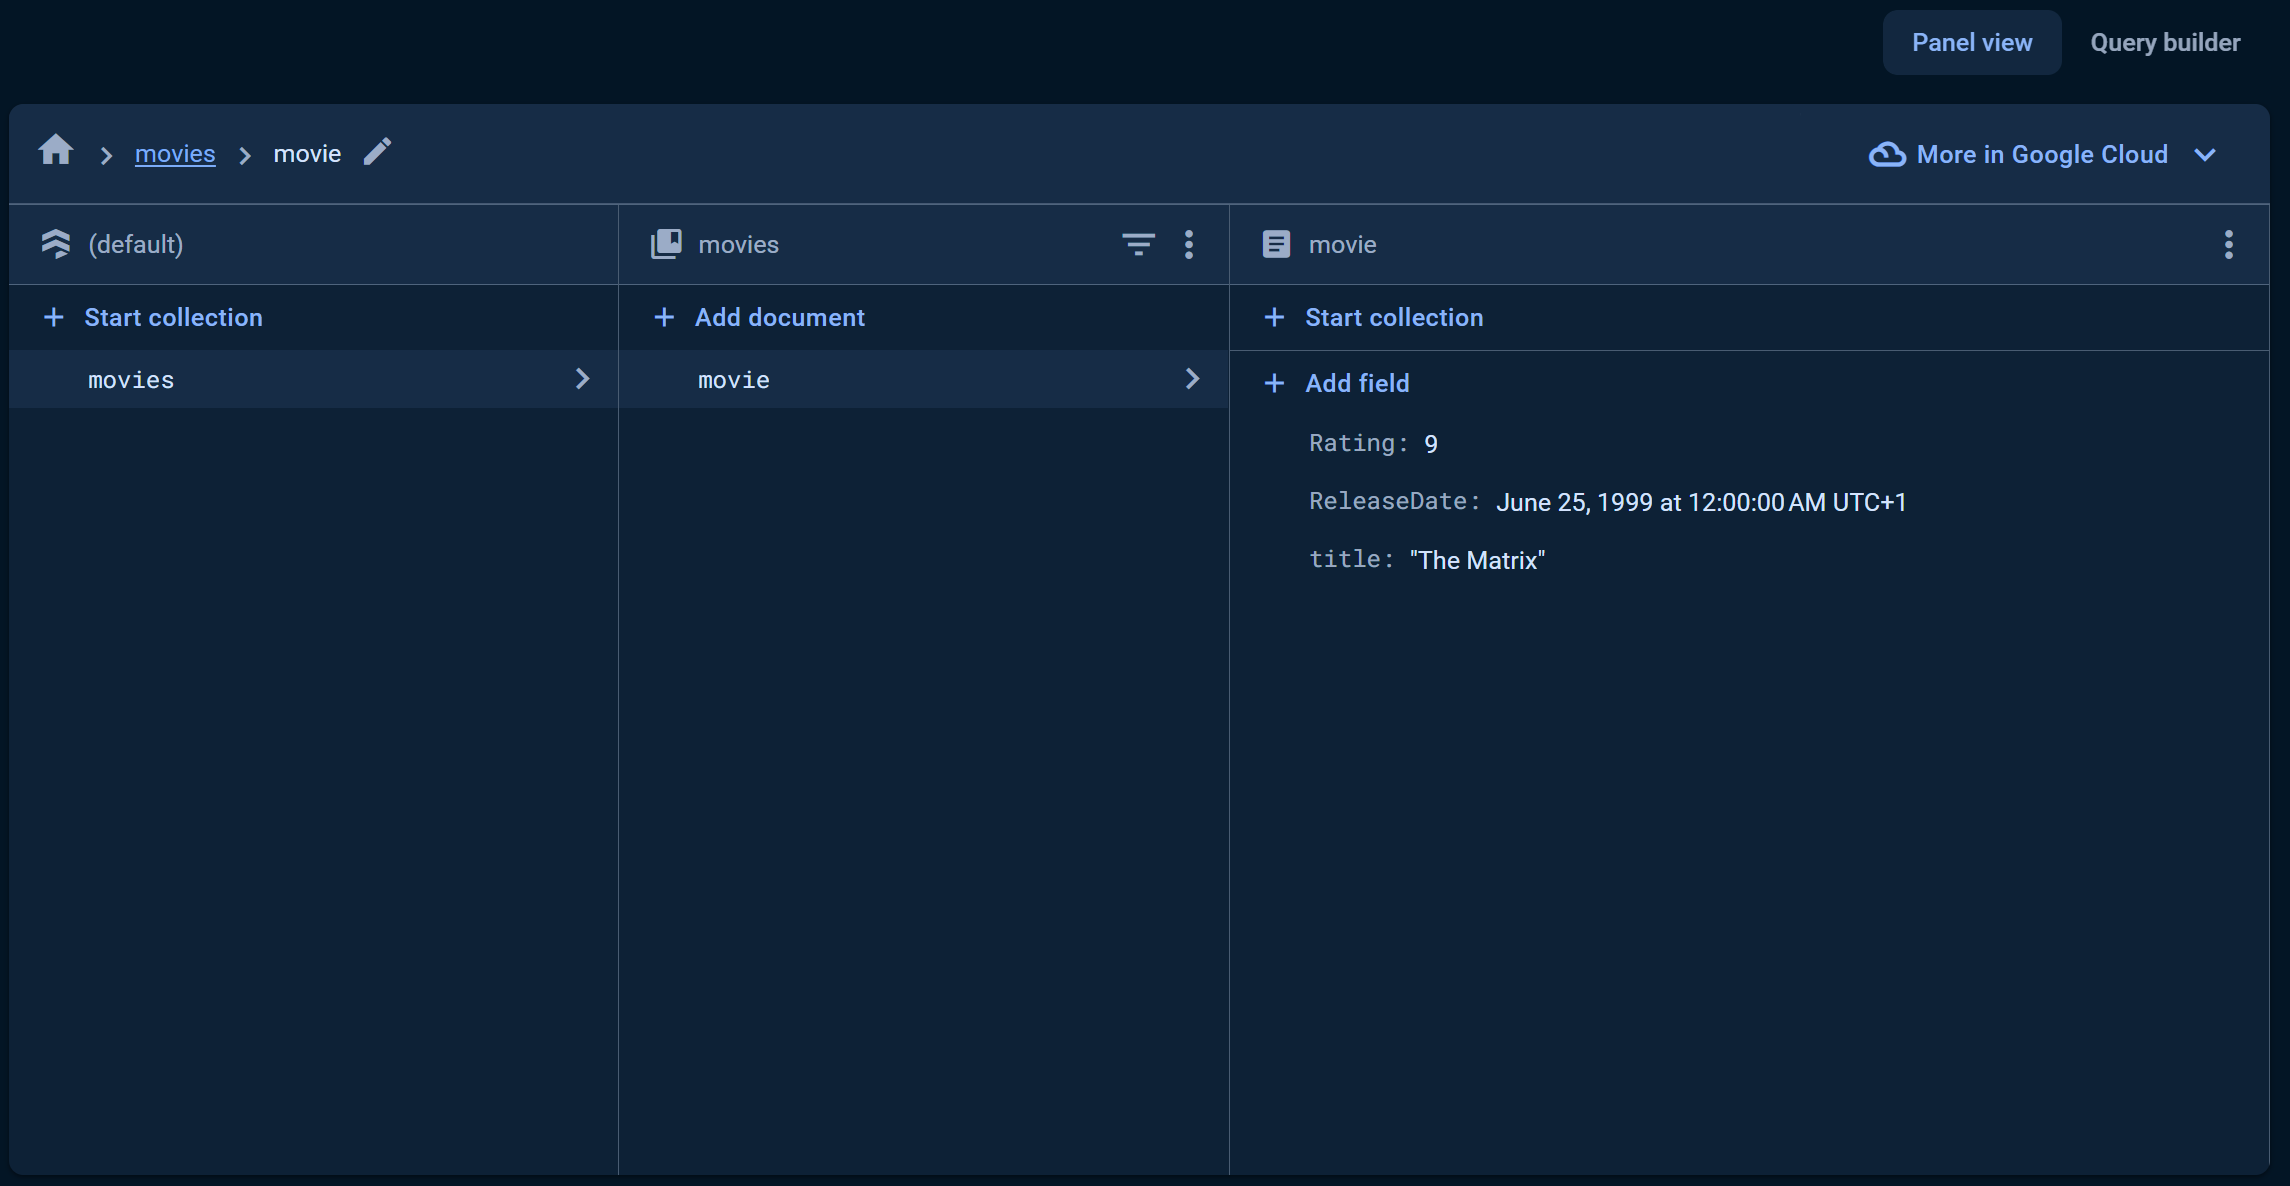
Pretty empty. Let’s add some basic information. If you read my articles before, you know I love to use movies as example data. Let’s add a movie, just one is enough. Cloud Firestore is not a regular database like MySQL or MSSQL. Thus, it might look a bit different.
A collection could be seen as a table in the database. Let’s add a collection by clicking on the “Start collection”.

I will call my collection “movies” because it will contain movies. I use plural since it will contain more than one movie. When you click “Next” you will be prompted to add one document, which is also called an item. You can look at this as a row in the table. I will add The Matrix as an example:
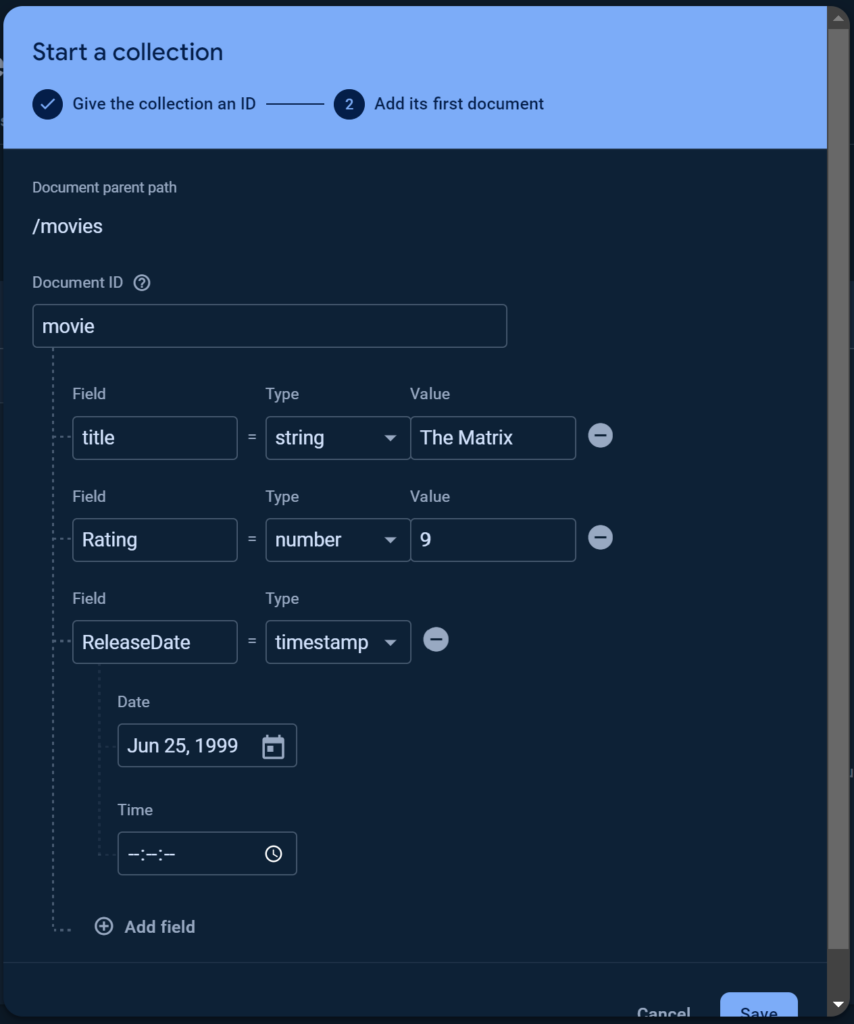
One of the things I like about this is that you can easily add data. For example, the ReleaseDate, which is a timestamp. You can browse for a date and select it.
Click “Save” when you are done and the document (or item) will be added to the new collection.
Adding App To Project
We only have to do one more thing to do before we can use Cloud Firestore with Angular: register an app inside our Firebase project. This is done to generate some configuration that will be used in Angular so our Angular app knows where to find the Firebase project and it has access to the part we want to use.
Setting Up The App To Project
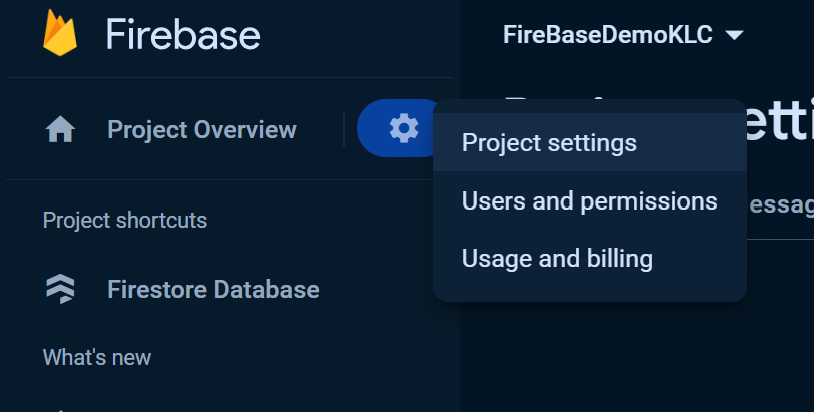
Step one: Go to the project settings. You can find this by clicking on the gear icon on the left top screen.
Step two: On the next screen, scroll down until you find a section that says “There are no apps in your project”.
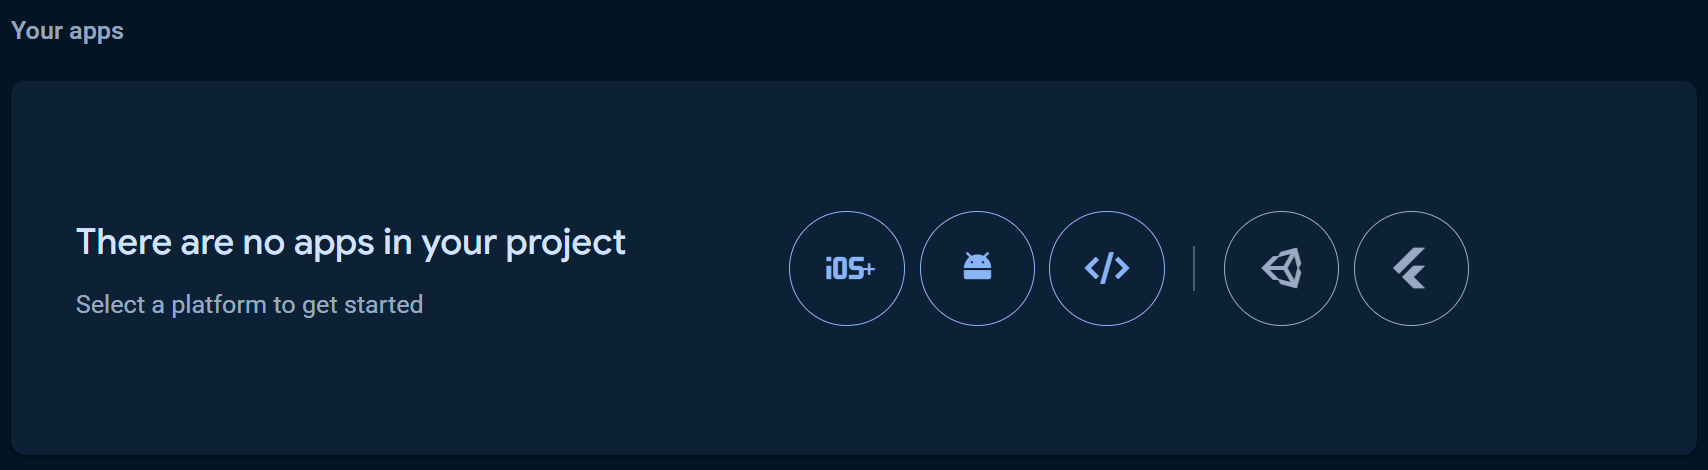
Step three: Click on the code icon, the 3rd from the left. Connecting other types to your project, such as iOS, Android, Unity, and Flutter, is also possible. But we are going for Angular, which is not listed but it’s a code thing.
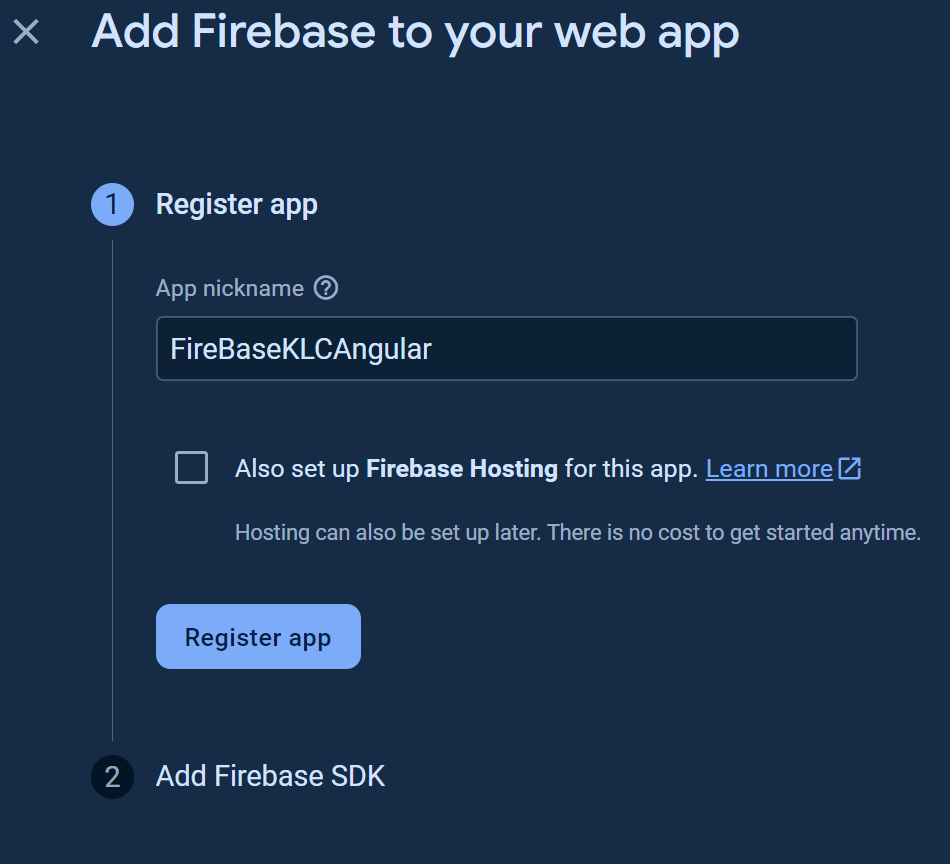
Step four: In the new screen, you register your app. Choose a nickname that makes sense, like FireBaseKLCAngular. I didn’t check the hosting part, because I don’t need that. I only want to use the features. Click on “Register app”. This could take a few seconds, but you will see something like this:
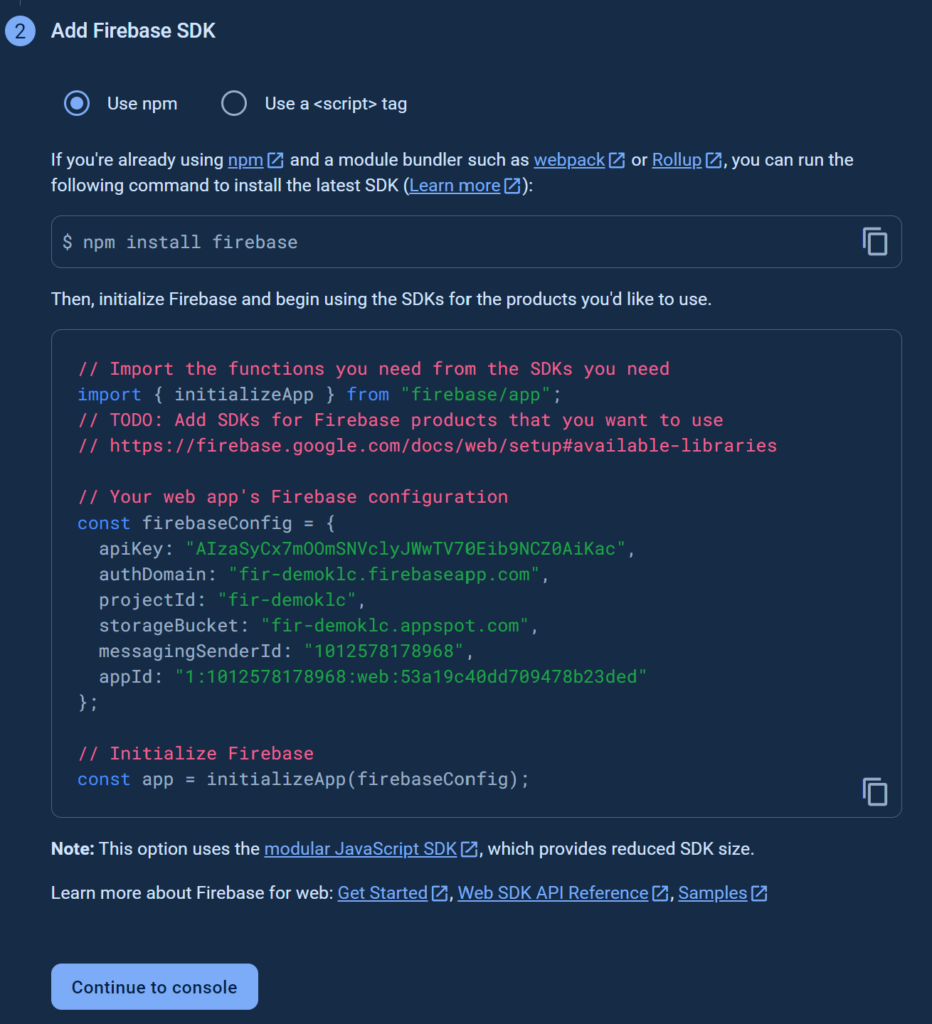
Storing Configuration
We will be using NPM and only need a small part of the code snipping shown on the screen. Copy only the const firebaseConfig. Thus, this part:
const firebaseConfig = {
  apiKey: "AIzaSyCx7mOOmSNVclyJWwTV70Eib9NCZ0AiKac",
  authDomain: "fir-demoklc.firebaseapp.com",
  projectId: "fir-demoklc",
  storageBucket: "fir-demoklc.appspot.com",
  messagingSenderId: "1012578178968",
  appId: "1:1012578178968:web:53a19c40dd709478b23ded"
};
Save it somewhere, because we will be needing this in Angular. Don’t use the code shown above; I will delete the project after I am done writing this.
Oh, notice the fir-demoklc? This is the strange project name I mentioned earlier. It’s a unique identifier that defines an endpoint and the project identifier.
That concludes the first part of this tutorial. Let’s connect this Cloud Firestore with Angular and grab that movie.
Using Firebase In Angular
It’s time to create a new Angular project and try to engage with the Cloud Firestore database. I will show how you can retrieve, create, update, and delete items, also known as the CRUD. But first, we install a package and set up the configuration in our Angular project.
I will be using Visual Studio Code for all actions.
A New Project
First, we should create the Angular application. This is a simple command:
> ng new firestoredemo --no-standalone --routing --ssr=false
I will be using SCSS and no Service-side rendering. After the project is created I empty the contents of the app.component.html.
That’s it for this step. Let’s install Firebase.
Install Packages
To make sure we can use everything we need from Firebase, we should install it into our project. Execute the following command:
> ng add @angular/fire
This command will walk you through the installation process of Firebase. It will ask if you want to proceed to install and execute @angular/fire@17.0.1. Choose yes. That 17.0.1 is the current version. Maybe you will have a different version, don’t worry about it.
After a while, you can choose which features you want to use:
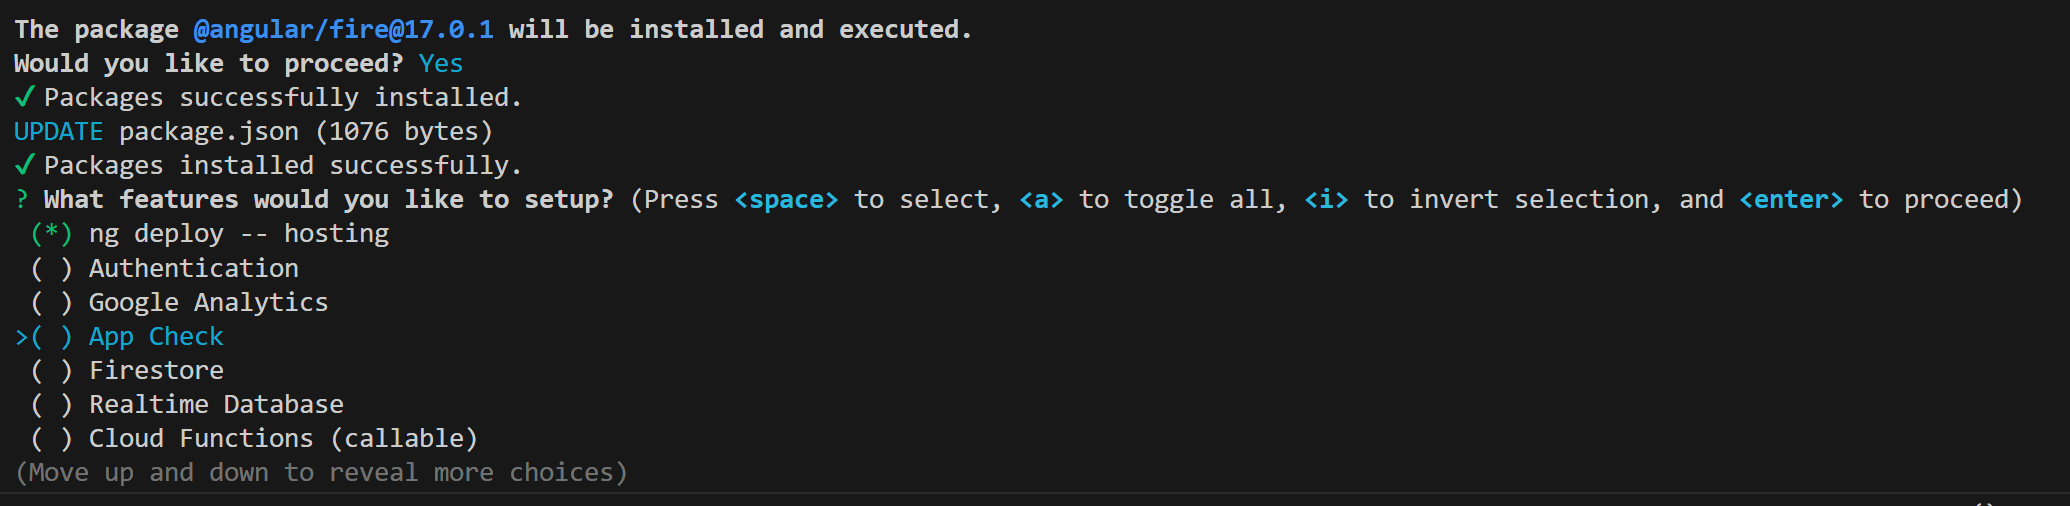
Use the up and down arrows to navigate. You can look around, but select the Firestore option with the spacebar. When you are done, hit the enter button.
Next is the question if you want to send over information. I choose n(o).
Don’t be scared, but it will open a browser screen where you can log into your Google account. Choose the account you used to create the Firebase account.
Note: I am not sure if this happens to everyone, but I had to press enter twice. Once to say no to the information being sent over. And then again for no apparent reason.
Note 2: If you don’t see the login screen and instead see an error in Visual Studio Code, stop the installation process (ctrl + c) and log out of Firebase. Maybe you have used a different account first, which is not connected to Firebase. To log out, use the following command:
> firebase logout
Run the installation again (the ng add @angular/fire).
The last steps are easy: Select the project we have created in Firebase (FireBaseDemoKLC). Then select the app (FireBaseKLCAngular). All done!
Yes, you can also create the project and app through this console, but I also wanted to show you the interface of Firebase.
Setting Configuration
Time to code! To make sure our Cloud Firestore with Angular works, we need to tell it where to find the Firestore database, we need to set the configuration. Time to grab that piece of code we copied earlier. The best place to store these is the environment. Let’s create these first (it’s not automatically created from Angular CLI 15.1).
> ng g environments
Open the environment.development.ts and paste the code snippet from Firebase in a way it fits inside the const environment:
export const environment = {
    firebaseConfig: {
        apiKey: "AIzaSyCx7mOOmSNVclyJWwTV70Eib9NCZ0AiKac",
        authDomain: "fir-demoklc.firebaseapp.com",
        projectId: "fir-demoklc",
        storageBucket: "fir-demoklc.appspot.com",
        messagingSenderId: "1012578178968",
        appId: "1:1012578178968:web:53a19c40dd709478b23ded"
    }
};
Save it. Then open the app.module.ts of your Angular project and find the provideFirebaseApp in the array of imports. This import has a big initialization, which is all the information we just saved in the environment.development.ts. Replace the provideFirebaseApp initialization with the following:
AngularFirestoreModule,
provideFirebaseApp(() => initializeApp(environment.firebaseConfig)),
provideFirestore(() => getFirestore())
Looks a bit nicer and it’s prepared for different environments.
Awesome! Let’s retrieve a movie!
Getting A Movie
Retrieving data is the easiest part, although it feels the opposite. A lot of information from this chapter can be reused in the next chapters. I am not going to make a shiny, cool Cloud Firestore with Angular app, but just a simple page that shows the movies. It will all happen in the app.component.ts, app.component.html, and app.component.scss.
Some Basic HTML
First some HTML. Open the app.component.html and copy-paste the following code:
<ul>
  <li *ngFor="let movie of movies$ | async">
    {{movie.title}} - {{movie.ReleaseDate}}
  </li>
</ul>

<ul>
  <li *ngFor="let movie of movies">
    {{movie.title}} - {{movie.ReleaseDate}}
  </li>
</ul>
Leave this as it is and head over to the app.component.ts.
Collecting Data From Cloud Firestore with Angular
We need to inject Firestore, create a public variable for the movies, retrieve the movies from Firestore, store those movies in the public variable… That’s it! The code looks like this:
import { Component, inject } from '@angular/core';
import { Firestore, Timestamp, collection, collectionData } from '@angular/fire/firestore';
import { Observable } from 'rxjs';

export interface Movie{
  Rating?: number;
  ReleaseDate?: Timestamp;
  title?: string;
}

@Component({
  selector: 'app-root',
  templateUrl: './app.component.html',
  styleUrl: './app.component.scss'
})
export class AppComponent {
  movies: Movie[] = [];
  db: AngularFirestore = inject(AngularFirestore);
  moviesCollection = collection(this.firestore, 'movies');

  constructor() {
    this.db.collection('movies').valueChanges().subscribe((movies: any[]) => {
      this.movies = movies;
    });
  }
}
You can also inject the Firestore in the constructor, but I prefer it the newer way. Not saying one is better than the other.
At the top, I have created an interface with the fields of the document (movie). This way I know what I can expect. Note that Rating and ReleaseDate are camel casing. This is because I have used camel casing in Firestore too. I do want to suggest using lower casings.
I inject Firestore, which has all the settings and configuration, and retrieve a collection. The collection is movies. Note that it’s really sensitive. If you use ‘Movies’ (capital M) it won’t work. You also won’t get an error. When the collection is done, I place the data from that collection in the public variable movies.
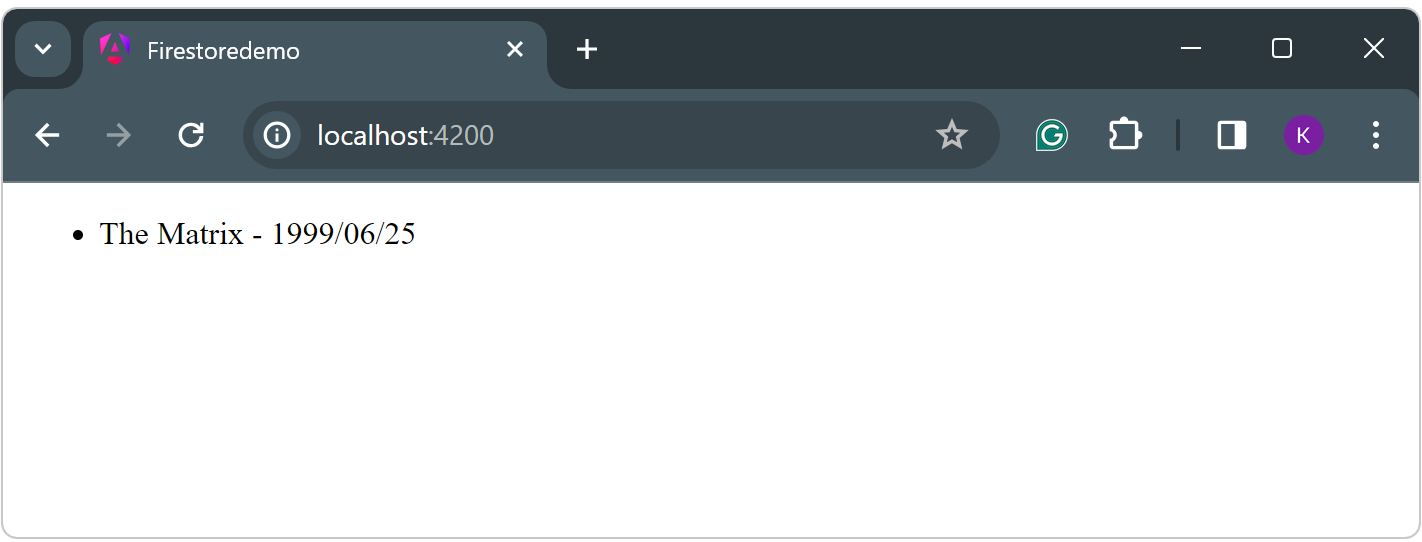
Save it all and run the application with ng serve -o.

Formatting The Date
Nice! Except the date is a bit weird. Normally you can just pipe ( | ) and set a date format, but this is a Firestore timestamp. You need to convert the ReleaseDate to a date first and then set the date format:
<ul>
  <li *ngFor="let movie of movies$ | async">
    {{movie.title}} - {{movie.ReleaseDate?.toDate() | date:'yyyy/MM/dd'}}
  </li>
</ul>
This results in:
Creating An Item
It is time to create a new movie and place it in Cloud Firestore with Angular. This is pretty simple. You only need this little piece of code:
saveMovie(movie?: Movie) {
  if (!movie) return;

  this.db.collection('movies').add(movie);
}
To activate this method, let’s add a button and a click event for this button. Place the following HTML under the list of movies:
<button (click)="onAddNewMovieClick()">Add new</button>
Add the following method to the TypeScript file:
onAddNewMovieClick() {
  this.saveMovie({
    Rating: 10,
    ReleaseDate: Timestamp.fromDate(new Date()),
    title: 'The Muppets Take Manhattan'
  })
}
When you run the app and click the button… A new movie will be added with a unique ID.
Updating An Existing Document
To update an existing document in Cloud Firestore with Angular you need the document you want to update (duh) and the unique identifier (ID) of that document. Thus, it would be a good practice to get the ID of the document. But how?
To make this happen we need to change some of the current code. Please read it carefully and take your time. To skimp through it or you might miss an important part.
We can add the ID of the documents when we retrieve the documents. To do this we don’t need the valueChanges, but the snapshotChanges. The big difference is that the snapshotChanges also sends the metadata of a document and the metadata has the id. Change the constructor as shown below:
constructor() {
  this.db.collection('movies').snapshotChanges().subscribe((moviesSnapshot) => {
    this.movies = moviesSnapshot.map((movieSnapshot) => {
      const data = movieSnapshot.payload.doc.data() as Movie;
      const id = movieSnapshot.payload.doc.id;
      return { id, ...data };
    });
  });
}
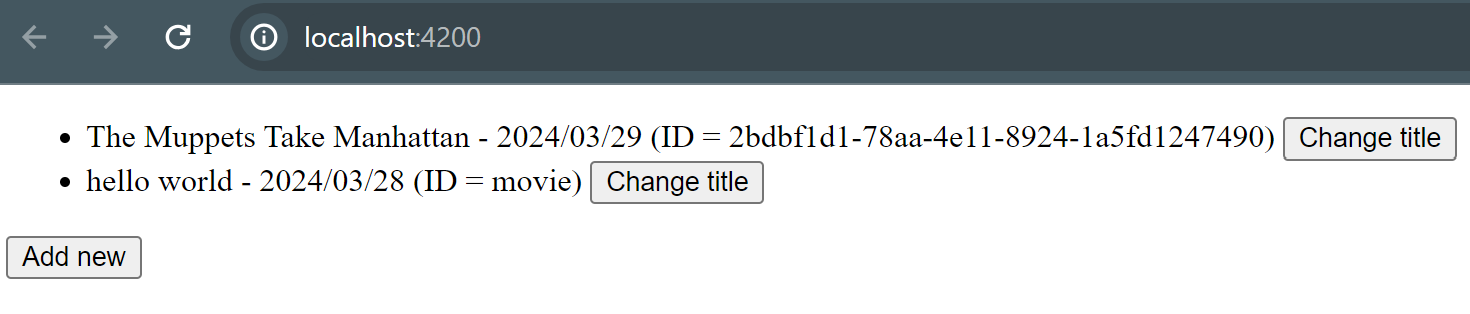
To see the IDs of the documents, add it to the HTML:
{{movie.title}} - {{movie.ReleaseDate?.toDate() | date:'yyyy/MM/dd'}} (ID = {{ movie.id }})
Next, create a method that will be called after we press a button to update a movie:
onUpdateMovieClick(id: string, movie: Movie) {
  const movieDoc = this.db.collection('movies').doc(id);
  movie.title = 'Hello world!';
  movieDoc.update(movie);
}
This method will receive the ID and the movie. It will change the title of the movie to “Hello world”. To activate this method, create a new button behind each movie shown on the HTML part:
<ul>
  <li *ngFor="let movie of movies$ | async">
    {{movie.title}} - {{movie.ReleaseDate?.toDate() | date:'yyyy/MM/dd'}} (ID = {{ movie.id }})
    <button (click)="onUpdateMovieClick(movie.id??'', movie)">Change title</button>
  </li>
</ul>

<button (click)="onAddNewMovieClick()">Add new</button>
If you run the application now, you will see that the title of the movie will change to ‘hello world!’.
Deleting An Item
Deleting a document from Cloud Firestore with Angular is even easier than updating and creating a document. Let’s start by adding a button to the HTML:
<ul>
  <li *ngFor="let movie of movies$ | async">
    {{movie.title}} - {{movie.ReleaseDate?.toDate() | date:'yyyy/MM/dd'}} (ID = {{ movie.id }})
    <button (click)="onUpdateMovieClick(movie.id??'', movie)">Change title</button>
    <button (click)="onDeleteMovieClick(movie.id??'')">Delete</button>
  </li>
</ul>

<button (click)="onAddNewMovieClick()">Add new</button>
Then create the method onDeleteMovie All we need to do is grab the document from Firestore and delete it. It’s similar to creating or updating, but way shorter:
onDeleteMovieClick(id: string){
   this.db.collection('movies').doc(id).delete();
}
Run the application, press the “Delete” button, and the document is deleted. Easy!
Create A Query
Getting the items from a collection is cool, but you will get all the items. I would highly recommend not to do that. Having a few thousand items will result in some performance issues or worse. It’s better to query the items and only get them from the collection you need.
Using Cloud Firebase with Angular, you can create a query to grab only those items you need. All you need to do is tell what the condition(s) is(are). To demonstrate this, I have added a button to the HTML, just below the button Add new:
<button (click)="onFilterMoviesClick()">Show seen only</button>
Next, I created the method in TypeScript:
onFilterMoviesClick() {
  this.db.collection('movies', ref => ref.where('seen', '==', true))
    .snapshotChanges()
    .subscribe((moviesSnapshot) => {
      this.movies = moviesSnapshot.map((movieSnapshot) => {
        const data = movieSnapshot.payload.doc.data() as Movie;
        const id = movieSnapshot.payload.doc.id;
        return { id, ...data };
      });
    });
}
It looks a bit the same as the one in the constructor, but I added a second parameter: ref. The ref is a CollectionReference and has a method called where which is similar to the C# variant (if you are into C# too). The where gets three parameters: field, operator, and value.
The CollectionReference
The field is the field of the item and you need to be careful; it’s sensitive with capitals and lowercasing. The operator can be the known type of operator (==, !=, >, >=, <=). You can find more about the operators on the official website. And the value can be anything, as long as it fits with the type of the given field.
The rest is the same as the one in the constructor. It would be better to create one method to handle retrieving the data. But this is a demo. I think you can manage generalizing code yourself.
Limit The Results
One more tip: Are you still getting a lot of documents or want to limit the number of documents from the Cloud Firestore with Angular? Use the limit:
onFilterMoviesClick() {
  this.db.collection('movies', ref => ref.where('seen', '==', true).limit(5))
    .snapshotChanges()
    .subscribe((moviesSnapshot) => {
      this.movies = moviesSnapshot.map((movieSnapshot) => {
        const data = movieSnapshot.payload.doc.data() as Movie;
        const id = movieSnapshot.payload.doc.id;
        return { id, ...data };
      });
    });
}
Conclusion On Using Cloud Firestore With Angular
And there you have it: A beginner guide to Cloud Firestore with Angular. I handled most of the basic aspects of this article. The whole CRUD is laid out with some extra information, such as creating a Firebase account and Firestore database and querying.
The benefit of using Cloud Firestore with Angular is that you don’t need an API for storing data in a database environment. Cloud Firestore, or rather Firebase, fits seemingly in your Angular application.
Of course, there is much more to it, but you have to start somewhere. Sure, I could have put everything on this subject in one article, but then you would stop halfway because it would be too much to read in one sit. I prefer splitting it into different articles. Stay tuned for more!