
One of the things that happens a lot when you have a website, with registration possibilities, is people who register with a fake e-mail and lose it before they confirm their e-mail. This leaves you with a lot of unused accounts. There are ways to delete them. One of them is by hand, but this can be time-consuming and it’s not something you look forward to. Then there are plenty of plugins that could do it for you, but usually, they just don’t do what you want. The best way is to create a WordPress cron schedule or cron job.
Table Of Contents
WordPress Cron Schedule In A Nutshell
A WordPress cron schedule runs in a specific interval. You can create schedules that run hourly, twice a day, or daily. These schedules are run as soon as someone activates a page on your website. A small function is triggered to check if there is a schedule to run and if so it will run it.
Unlike popular belief, it’s not a background task running that will be activated as soon as the schedule needs to run. You will need a server function for that and PHP is not a server function. The WordPress cron schedules are only hit when a page (admin or front end) is (re)loaded.
WordPress is using the WP-cron system to schedule and execute certain functions. You might not see and notice it, but there are already a lot of scheduled events in the core of WordPress.
In this article, I want to show you how you can create a WordPress cron schedule using a simple piece of PHP code inside the functions.php of your theme.
Purpose Of The WordPress Cron Schedule
I want to create a simple WordPress cron schedule that checks which unconfirmed user accounts have been lingering in my system for more than 5 days. This means I need to find the users that are older than 5 days and have a status ‘awaiting_email_confirmation’.
The ingredients for this are:
- A local WordPress website with a theme (can be any theme)
- A functions.php (all themes have one)
- PHP (…duh)
- PHPMyAdmin
- A PHP editor (I am using Visual Studio Code)
Mix them all and we have a schedule! Well, almost.
Creating A WordPress Cron Schedule
It all starts in the functions.php. If you have a lot of code in the functions.php I do suggest placing the WordPress cron schedules inside a different file and include that file in the functions.php. For demonstration purposes, I will stick to the functions.php.
There are three parts to create: The actual schedule, the hook, and the implementation of the hook.
The Actual Schedule
Schedules are created by WordPress, but also by other plugins. It’s vital to check if the schedule is already created. This way you avoid problems and mixups. You can do this with the wp_next_scheduled(name_of_schedule) function. It will check if the schedule with the name already exists and returns true or false.
if (!wp_next_scheduled('cron_delete_users')) {

}
The code above will check if the schedule with the name ‘cron_delete_users’ exists or not. If not, it will execute the body of the if-statement.
Next, we will create the schedule, which can be used in the action-hook. This is done with the function wp_schedule_event(). It has 5 parameters, but we will only be using the first 3:
- timestamp
Timestamp of when to run the next event - recurrence
Sets how many times the event should be run. Options are daily, twicedaily, and hourly. - hook
The name of the hook that is bound to the action
In my case, the PHP code would look like this:
if (!wp_next_scheduled('cron_delete_users')) {
    wp_schedule_event(time(), 'daily', 'cron_delete_users');
}
This will create the WordPress cron schedule, but it is not hooked to anything. The scheduled event is now set to ‘daily’. Change this to ‘twicedaily’ or ‘hourly’ if you want to run it more often.
Hooking To Action
Now that we have created the schedule, we need to bind it to a hook, which will bind it to a function. We need to hook it to an action. The add_action will trigger your function right when WordPress starts initializing. In our case; trigger the scheduled event.
To hook the scheduled event with the add_action, use the following code:
if (!wp_next_scheduled('cron_delete_users')) {
    wp_schedule_event(time(), 'daily', 'cron_delete_users');
}
add_action('cron_delete_users', 'cron_delete_waitingforemail');
Awesome! Except, this would end in errors because the hook add_action needs the function cron_delete_waitingforemail(), which will execute the code to delete the lingering users.
And Action!
Finally the real action; getting the users with the status ‘awaiting_email_confirmation’ and older than 5 days. There are several ways to accomplish this; using metadata, TSQL, and the WordPress user system. I prefer the TSQL because it’s easy to create, test, and change. But feel free to use anything that you feel comfortable with. This is about the WordPress cron schedules, not the code inside the schedules.
Below you see the implementation of the method cron_delete_waitingforemail.
function cron_delete_waitingforemail()
{
    global $wpdb;
    $user_status = 'awaiting_email_confirmation';

    $query = $wpdb->prepare("
        SELECT u.ID
        FROM {$wpdb->prefix}users as u
        INNER JOIN {$wpdb->prefix}usermeta as m ON u.ID = m.user_id
        WHERE m.meta_key = 'account_status'
        AND u.user_registered < DATE_SUB(CURDATE(), INTERVAL 5 DAY)
        AND m.meta_value = %s
    ", $user_status);

    $results = $wpdb->get_results($query);

    foreach ($results as $user) {
        wp_delete_user($user->ID);
    }
}
wp_delete_user has a second optional parameter: $reassign. This can reassign posts and links to a new user ID if needed. You can set all posts written by the to delete user to the admin id… Or something… I don’t know, be creative.
The DATE_SUB(CURDATE(), INTERVAL 5 DAY) will get the current date and subtract 5 days, leaving it with the current date minus 5 days, which is what we want for the user accounts to be if we want to delete them.
Anyway, back to the code. A simple TSQL query fetches all the users. This will give you information like when the user has been registered. The query also joins with the user meta, which contains the account status. Combine the registration date and the account status, and you have what you need to determine if the user needs to be deleted or not.
That’s it! Your new WordPress cron schedule is ready. It will run when you load a page on your website.
Testing A Scheduled Event
One of the downsides of working with WordPress cron schedules is that it’s harder to debug. The run is in the background, not notifying any part of the front end. There are tons of hints of what you can do to debug your scheduled event, but for me, it didn’t work.
What I did was add an option to the WordPress options, which is easy to read with PHPMyAdmin. For example: The query wasn’t working and I didn’t get any users, while I knew there was a user of a month old with the proper status. I needed to see what the query was. I wrote the query to the options:
function cron_delete_waitingforemail()
{
    global $wpdb;
    $user_status = 'awaiting_email_confirmation';

    $query = $wpdb->prepare("
        SELECT u.ID
        FROM {$wpdb->prefix}users as u
        INNER JOIN {$wpdb->prefix}usermeta as m ON u.ID = m.user_id
        WHERE m.meta_key = 'account_status'
        AND u.user_registered < DATE_SUB(CURDATE(), INTERVAL 5 DAY)
        AND m.meta_value = %s
    ", $user_status);

    update_option('the_query', $query,false);

    $results = $wpdb->get_results($query);

    foreach ($results as $user) {
        wp_delete_user($user->ID);
    }
}
Run this WordPress cron schedule and then go to PHPMyAdmin. Select the database and edit the query. Use the following query (change the DBPREFIX to your own):
SELECT * FROM `DBPREFIX_options` WHERE option_name='the_query';
This will give you the following result:
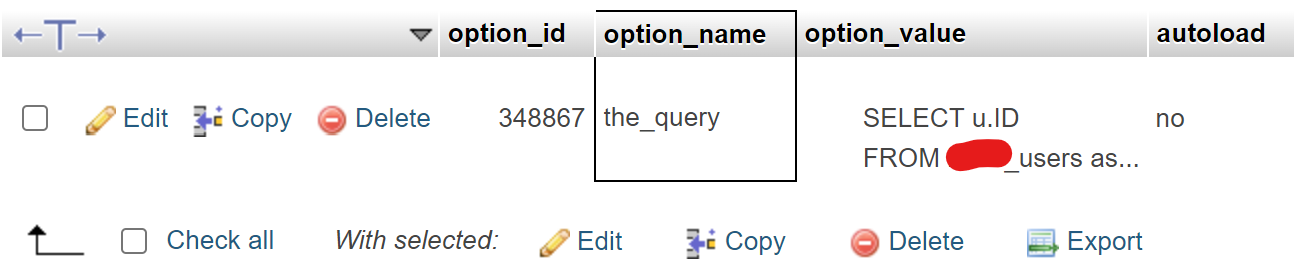
Double-click on the option_value and you can copy the query for inspection.
Removing WordPress Cron Schedule
The wp_schedule_event will create the WordPress cron schedule, but when someone deactivates and/or deletes your plugin, you need to unschedule it again. If you don’t the schedule will still exist inside WordPress, but it has no code attached. This is maybe the easiest piece of code in this document.
You start by creating a function that will be hooked to the register_deactivation_hook. Inside the function, you check if the WordPress cron schedule exists. If so, you can unschedule the event.
The register_deactivation_hook will only be called when someone deactivates your plugin.
function my_cron_schedules_deactivation() {
    $timestamp = wp_next_scheduled('cron_delete_users');
    if ($timestamp) {
        wp_unschedule_event($timestamp, 'cron_delete_users');
    }
}
register_deactivation_hook(__FILE__, 'my_cron_schedules_deactivation');
You can add more WordPress cron schedules to remove in this method. This won’t work if you don’t have a plugin and add everything to the functions.php.
Custom Recurrence
In some cases, the default recurrences are not convenient. You could need to run a scheduled event after 5 days or something. Although it’s not default, you can add your recurrences and it’s pretty easy to do in the functions.php.
First, create a function that gets the current schedules as a parameter. Add a new schedule to that with an interval and display. The interval has to be in seconds. I usually use ChatGPT or Google to figure out what number or calculation I need, because… Well… I am just lazy. The function should return all the schedules.
To make sure this new function is called, add it to the WordPress filters by using add_filter.
function my_cron_schedules($schedules) {
    $schedules['every_five_days'] = array(
        'interval' => 5 * 24 * 60 * 60,
        'display'  => __('Every 5 Days'),
    );
    return $schedules;
}
add_filter('cron_schedules', 'my_cron_schedules');
Now you can change your WordPress cron schedule from daily to every_five_days.
if (!wp_next_scheduled('cron_delete_users')) {
    wp_schedule_event(time(), 'every_five_days', 'cron_delete_users');
}
This example shows you how to create a new WordPress cron schedule for 5 days, but you can do whatever you want. Just don’t create it for 1 second or something. Keep it realistic.
Events Overview
Although I am not a big fan of installing a lot of plugins, I do recommend one: WP Crontrol. This plugin will give you an overview of the current scheduled events inside your WordPress environment. You can run an event without waiting for the schedule to run it. It is also possible to delete and create new events, but you still need to remove or create the code.
You can use this plugin to test the WordPress cron schedule you are editing or creating and to see what is happening inside your WordPress website.
After installing and activating the plugin, you get a few new menu items that you won’t see that easily. The most important one is located at Tools -> Cron Events.
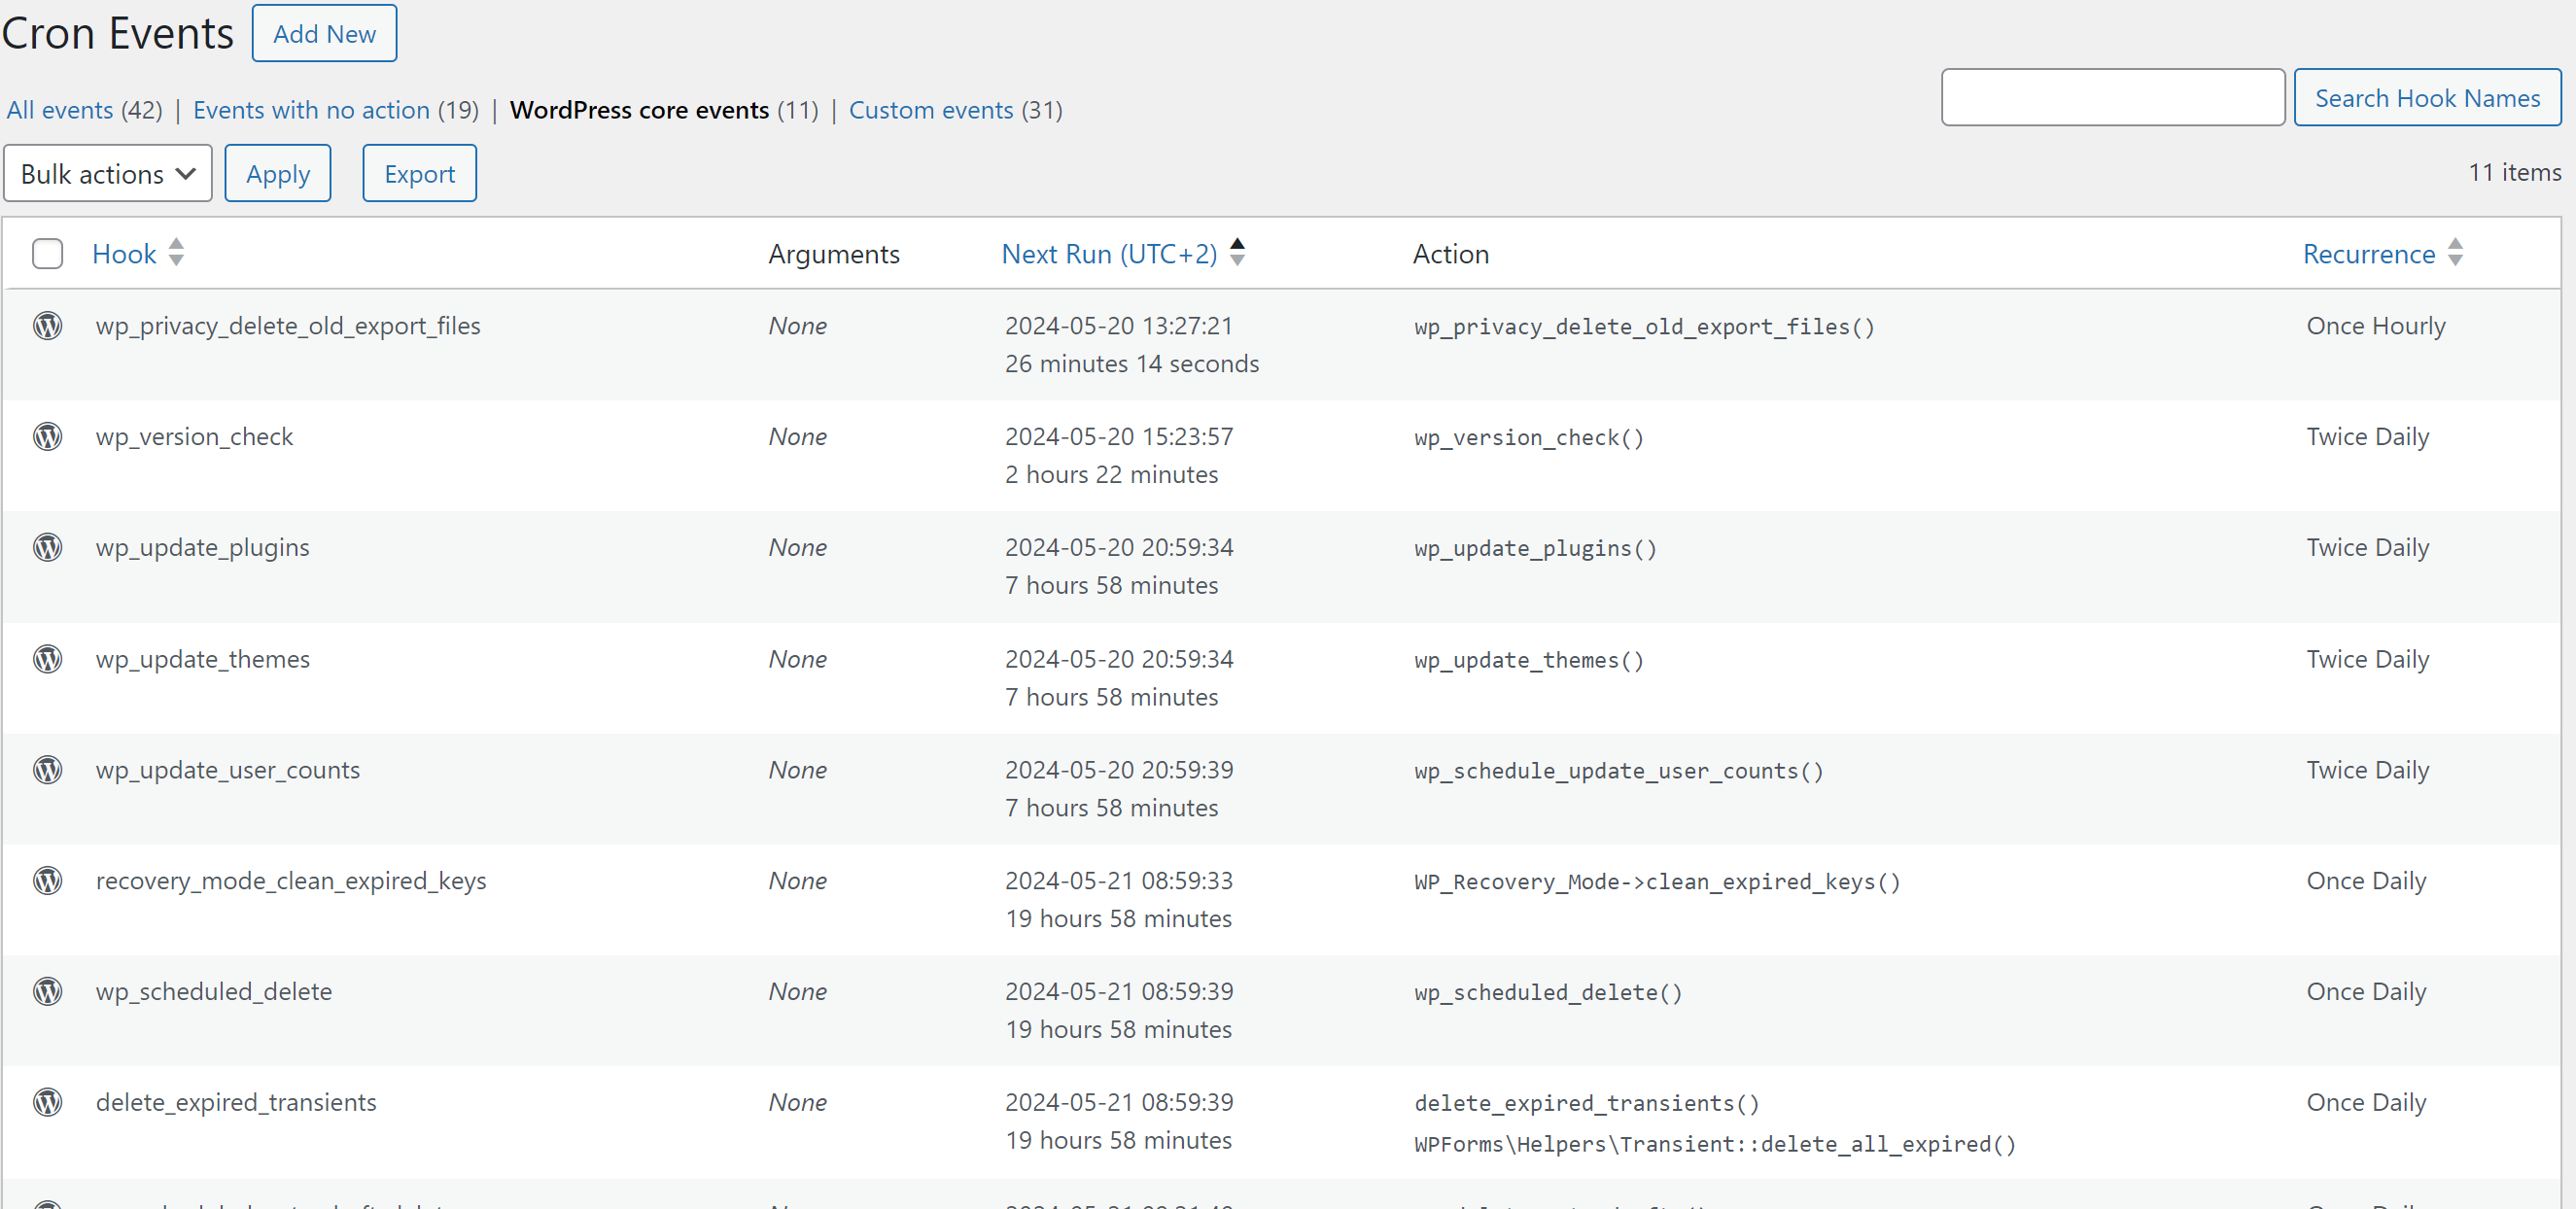
This gives you an overview of all the events scheduled in your WordPress environment. When you hover over an event, you can choose to run it now, making the event run the second you click it. Another option is to pause an event, making it stop running even though it is scheduled.
On top of the list, you see a filter. Clicking on this will only show you those events scheduled for that specific category.
You can also edit an event, changing the name of the hook, arguments, when the next run will be, and the recurrence.
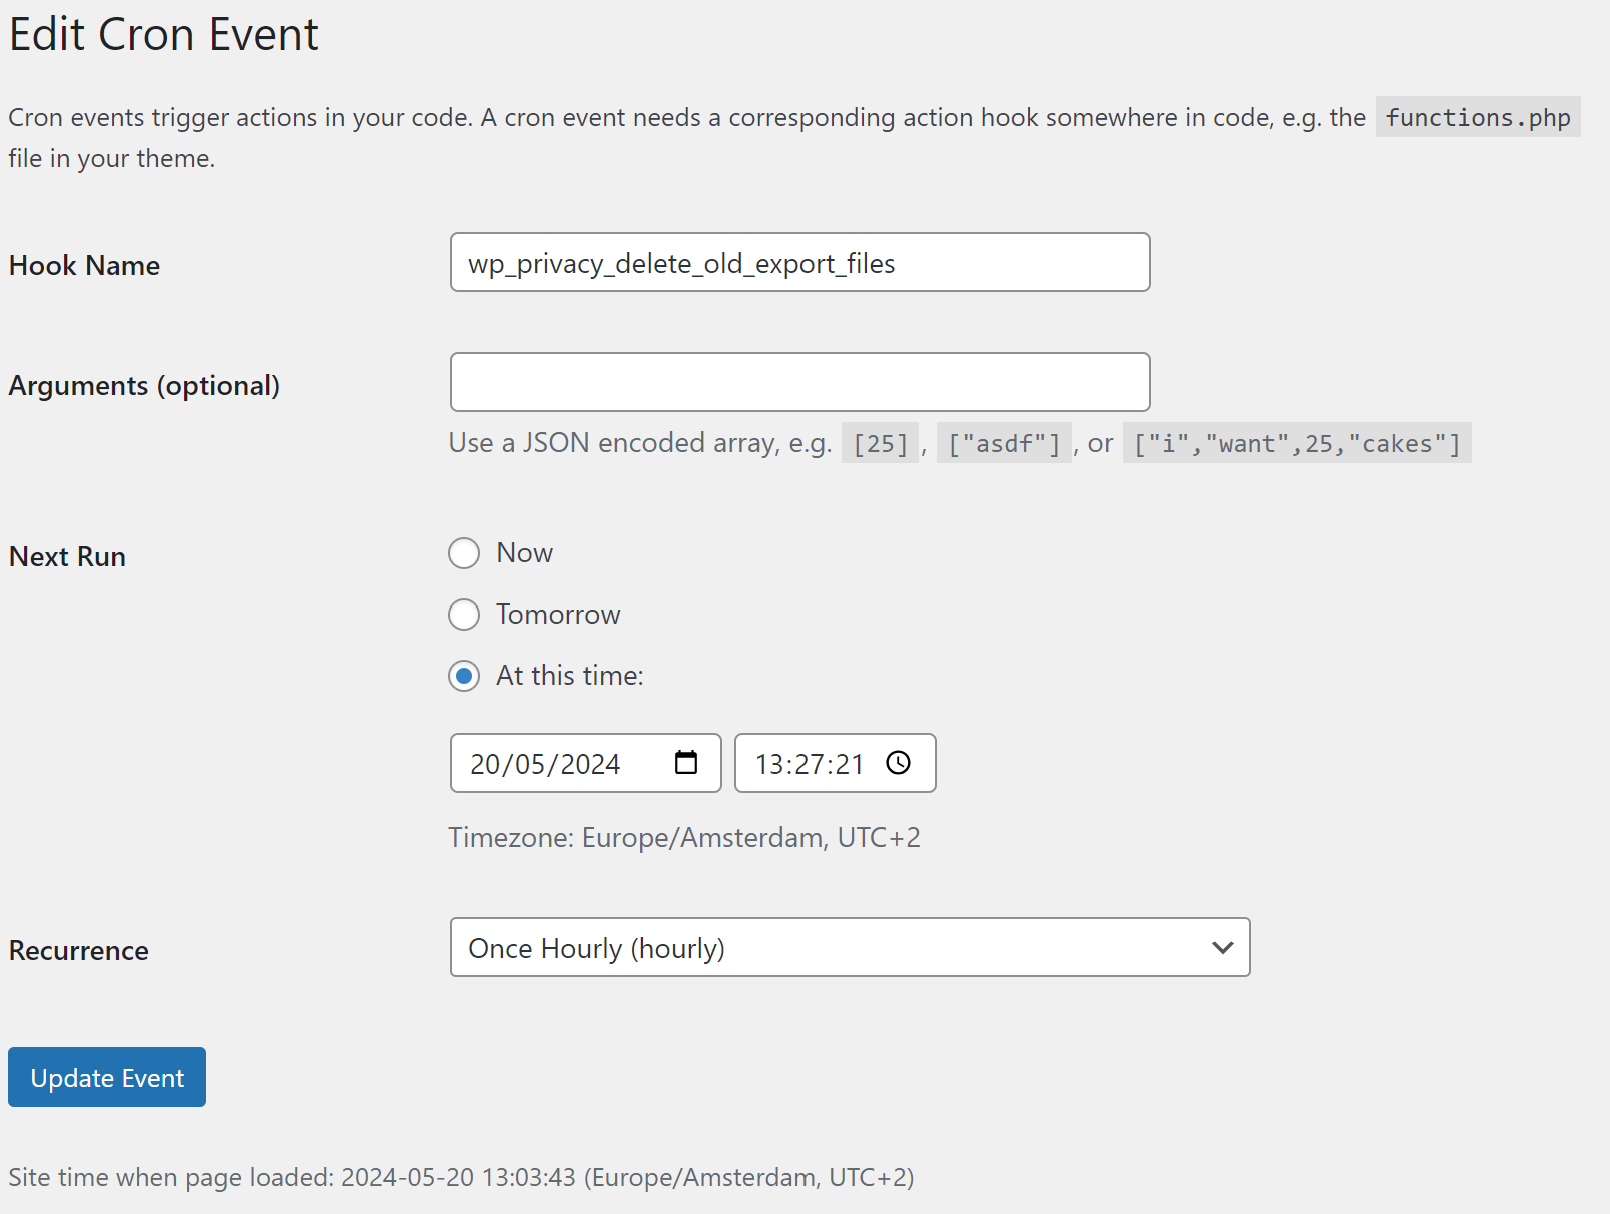
Warning: Do not change the core WordPress events!
If you don’t use this overview a lot, I suggest removing it when you are done. It’s a great plugin to check and test your WordPress cron schedule.
Final Words On WordPress Cron Schedule
A custom WordPress cron schedule can help you maintain data on your website and also do other stuff. For example: I have different parts of my website that need to swap content every 2 weeks. A custom WordPress cron schedule is handling that. I don’t need to change the content by hand.
Creating a WordPress cron schedule is pretty easy and doesn’t need to take a long time. Just be careful not to overdo it. I wouldn’t suggest creating hundreds of scheduled events, because it could slow down your website. Use it with care.
If you are creating a plugin that registers a schedule, don’t forget to remove the schedule when you deactivate or deregister the plugin. If you don’t, the schedule will keep existing in the WordPress system.


